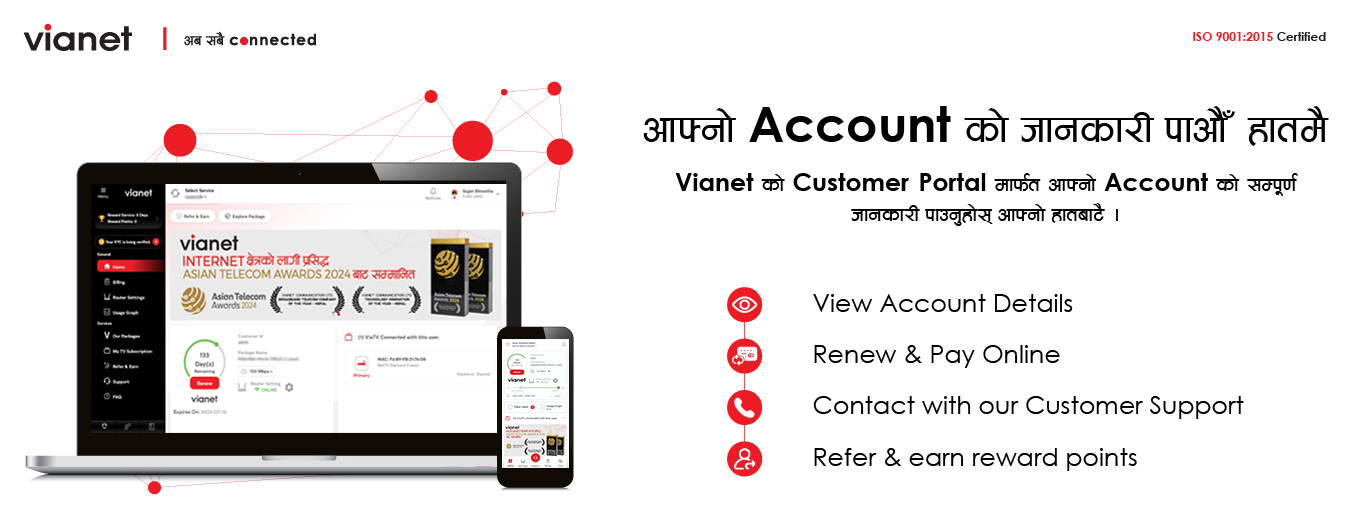
How to use Vianet Customer Portal
1. How to Login to your Customer Web Portal?
-
Go to our website www.vianet.com.np and click on “Login ” button at the top right of the page

-
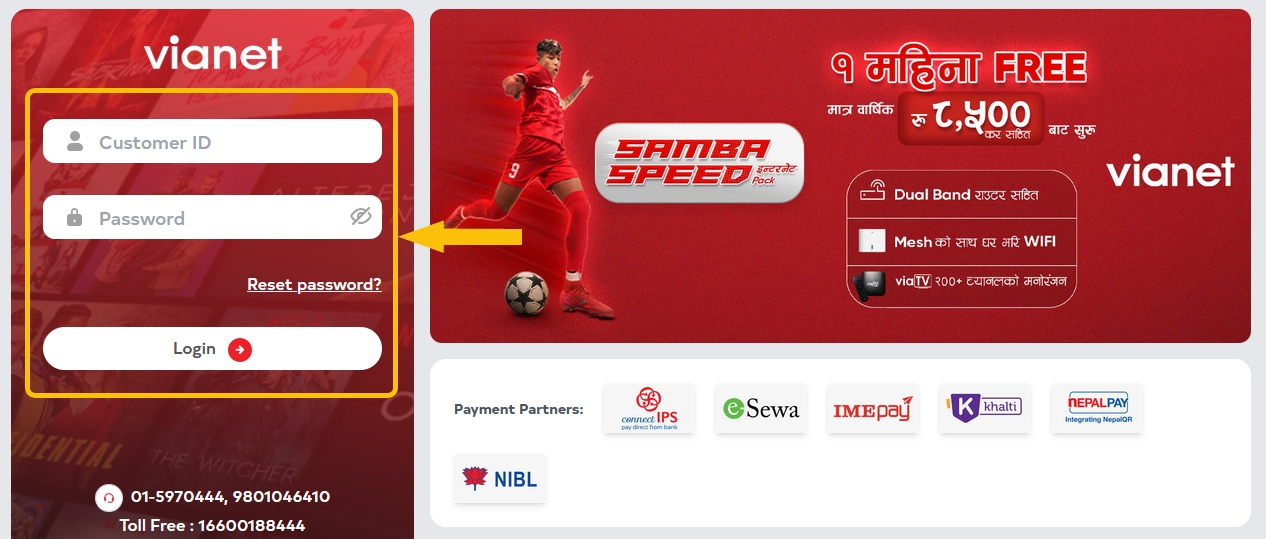
Enter your “Username and Password”.
-
If you have forgotten your password, please visit this section for instructions: “How to reset your password for Customer Web Portal if you have forgotten your password?“.
If you do not know your customer ID, please kindly reach out to our Call Centre at 01-5970444 or 9801046410.
-
You should now be logged in to Vianet Customer Web Portal.
2. How to reset your password for Customer Web Portal if you have forgotten your password?
-
Go to our website www.vianet.com.np and click on “Login ” button at the top right of the page

-
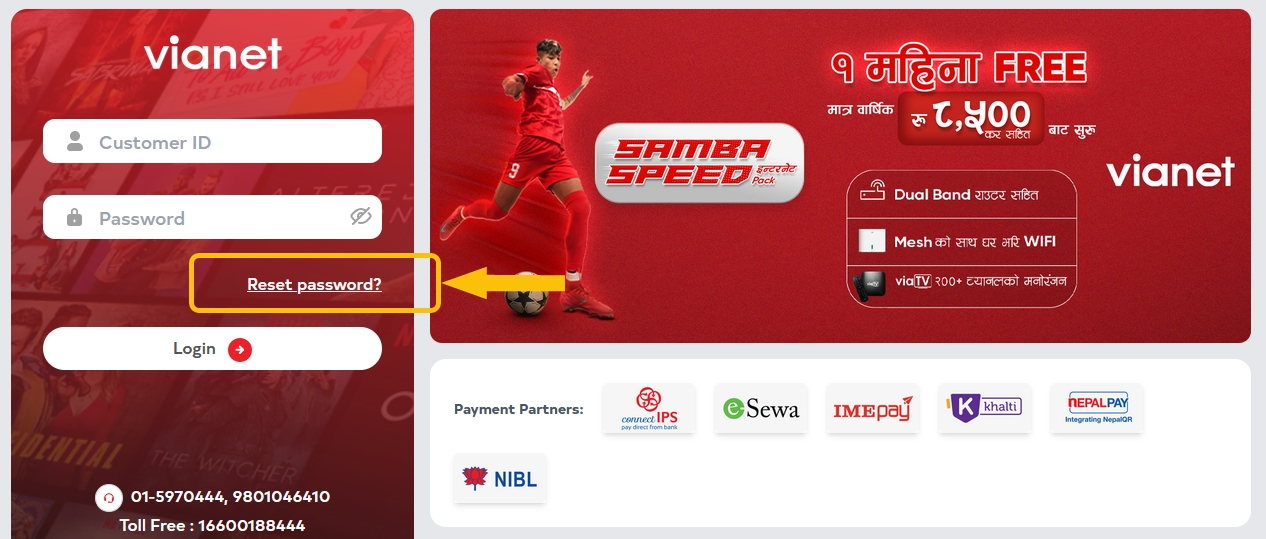
Click on the “Reset Password” link:
-
Then Enter your Customer ID and your primary Mobile number registered with your Vianet account.
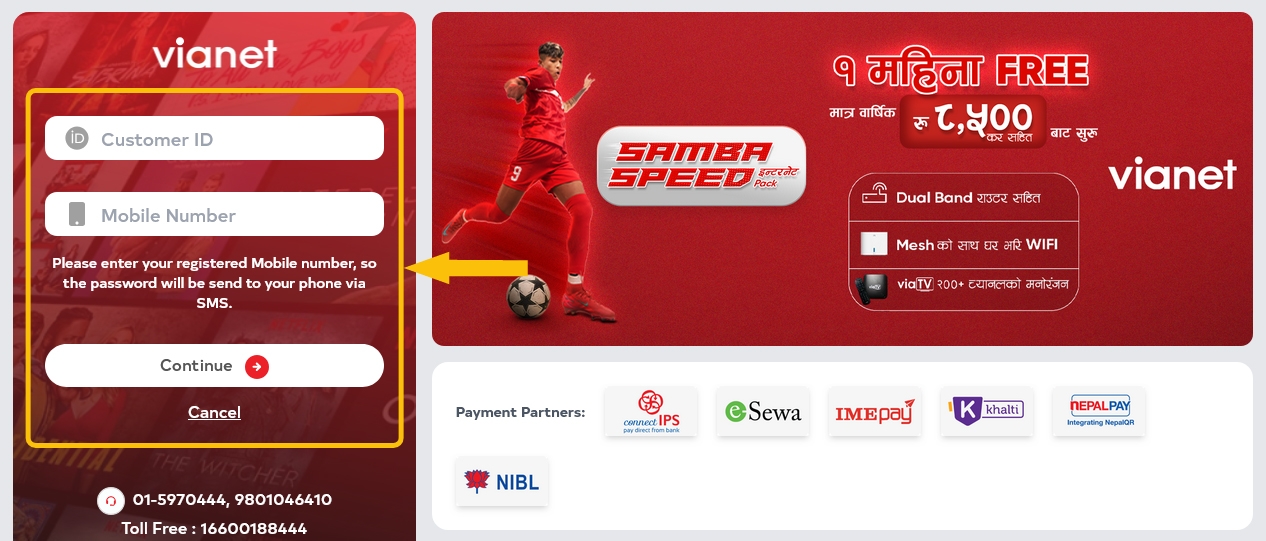
If you do not know your Customer ID or the primary mobile number registered with your account, please kindly call our Call Centre at 01-5970444 / 9801046410 for assistance.
Click on “Reset Password”. You should then receive an SMS on your registered number with the new password. We recommend that you change the password to one that you can remember.
4. How to Renew and Pay Online using Customer Web Portal?
- Login to Vianet Customer Portal.
If you do not know how to login to our Customer Web Portal, visit the instructions here: “How to Login to your Customer Web Portal?“ -
If you have multiple internet services, click on the “Select Service”, then it will show list of Services you have taken then select the Internet Service you want to view details of. Select the one for which you want to Enable and proceed.

-
On dashboard you can view details of your internet package subscription here. Please check your current expiry date on the top left circular icon that mentions “Expires in XXXX-XX-XX“.
Internet accounts expire at 12am of the date of expiry.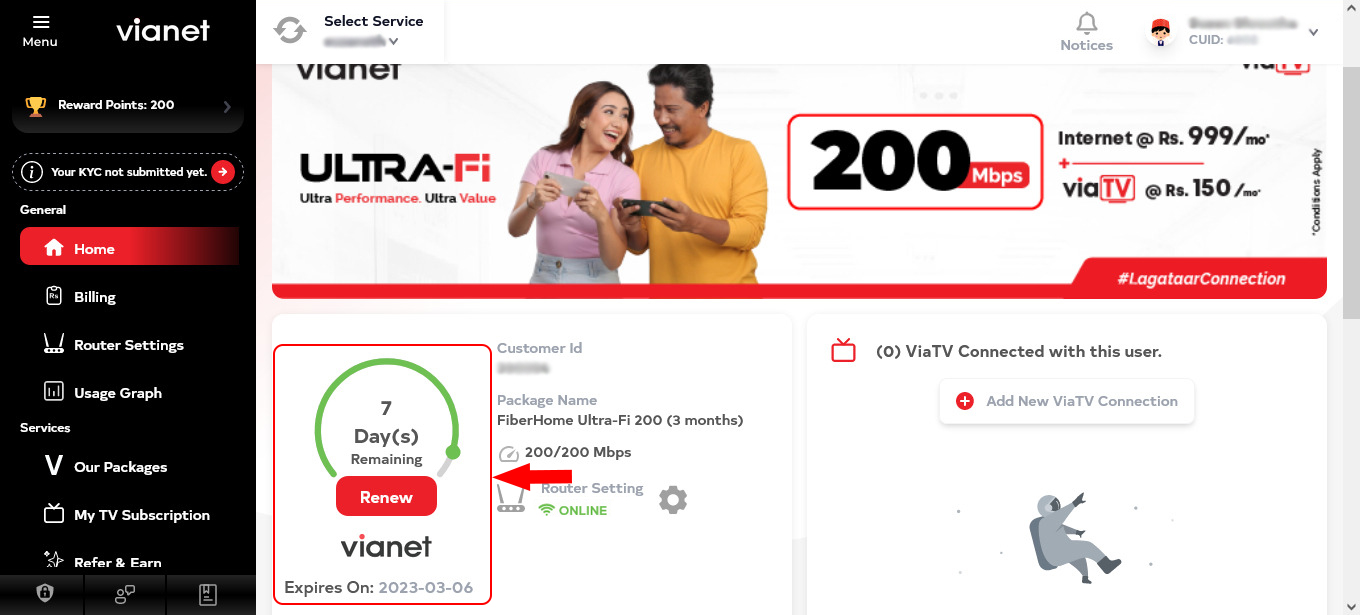
-
To renew your account click on the “Renew” button.
-
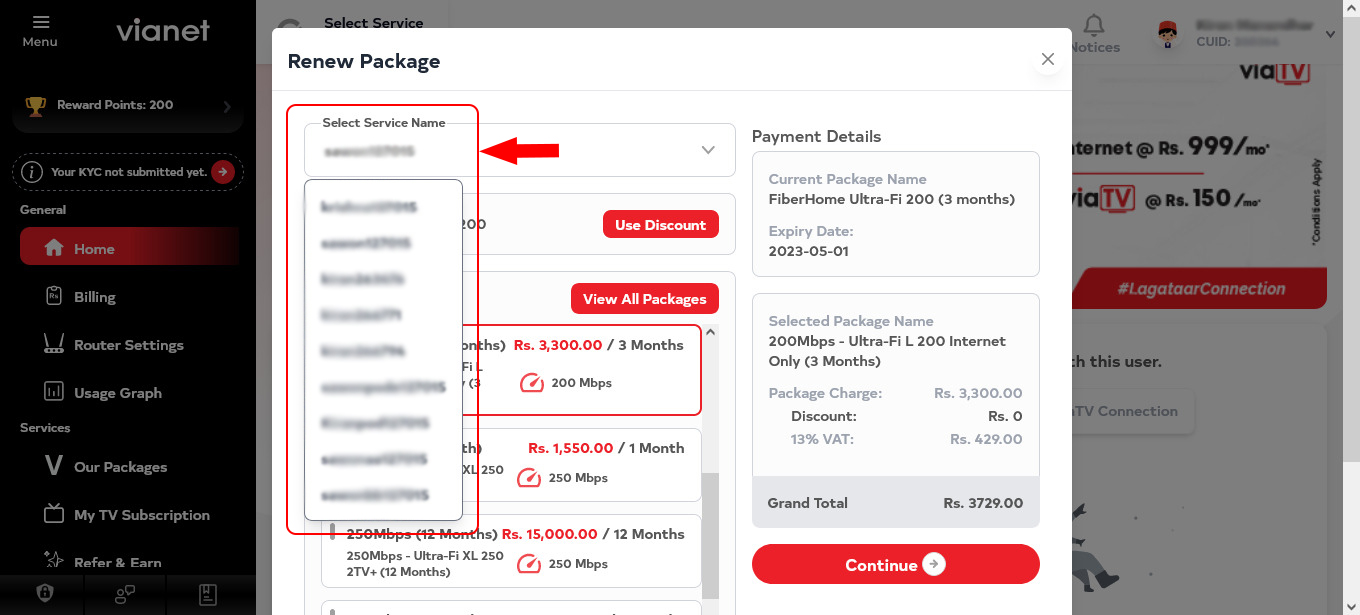
Select the Internet service which you want to renew. This is useful for customers who have multiple internet service associated with their account. If you have only one, it will be automatically selected.
Your current service will be automatically selected and shown at top of the “Select Pacakge” list
-
Your current service will be automatically selected and shown at top of the “Select Pacakge” list
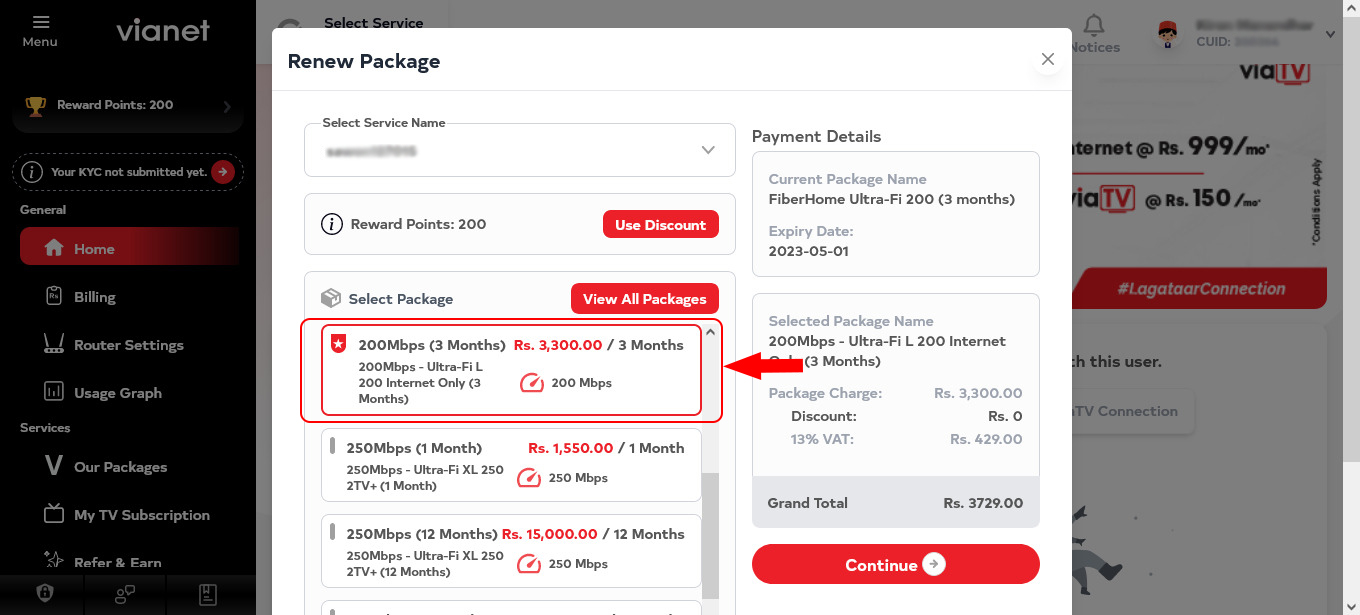
Or you can select other internet plans from the list as you want to go with. Description regarding the package selected will be automatically displayed right side of the package selected.
-
If you have Vianet “Reward Points“, you can use your Reward Points here to discount your Internet bill.
Your reward points is displayed at the top left of the Customer Portal:
Click on the “Use Discount” button
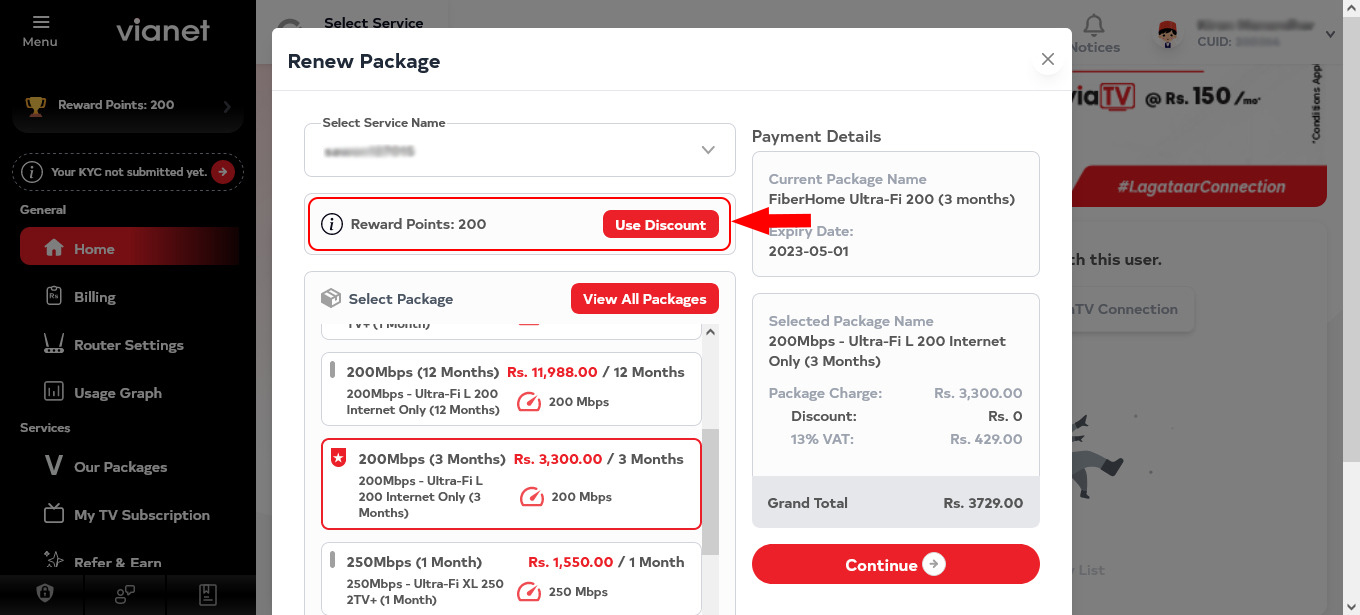
System will automatically discount the maximum reward points that can be discounted based on the reward points you have and the total bill amount.
Please note that reward points can only be used to discount a maximum of 50% of the total bill amount.
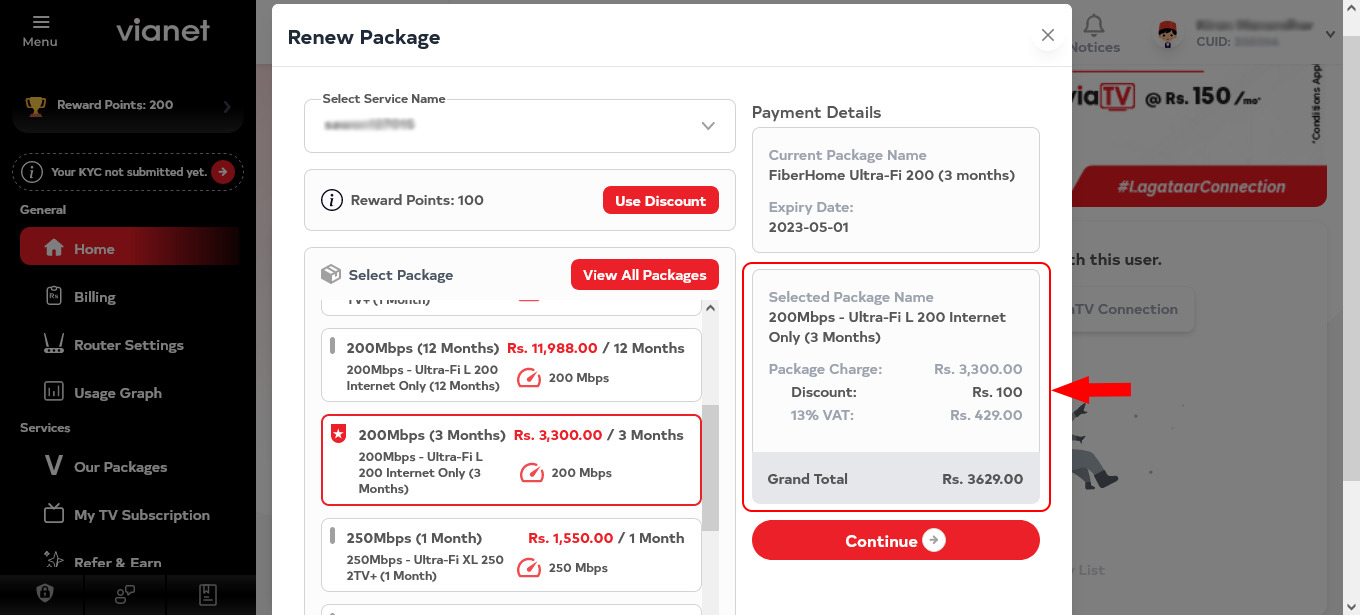
If you do not have any reward points, please kindly visit the Section: “How to make a Referral?” on Step 10.
Click here to learn about Reward Points and how it can be earned. -
Select payment method, “Payment Gateway” or “Pay Later“.

If you would like to pay online using services such as “ESewa, ConnectIPS or Mobile Banking“, please select “Payment Gateway” and proceed to Step 11.
If you would like to only renew for now and pay later at outlet, bank or online, please select “Pay Later“. Please kindly ensure to make payment within “24 hours” of renewing your account selecting the “Pay Later” option as your Internet will only be active for “24 hours” before getting disabled for non-payment.
Please note that you can only renew when selecting “Pay Later” option if your account is expired. You cannot renew your account before the account has expired when selecting the “Pay Later” option.
You can check your account expiry information as described in Step 4.
As Internet service expires at 12am of the expiry date, we recommend to “Pay Bill in Advance” by clicking on “Renew” button feature which automatically renews your account upon expiry.
-
If you have selected the “Pay Now” option, please kindly select one of the various Payment Gateways available. Then click on “Continue” button.
Instructions will then be provided on the screen for you to make payment.
Once the payment is completed, your account will be renewed and paid. -
If you have selected the “Pay Later” option, you can click on the “Continue” button to complete renewal. If you would like to pay online after renewing your account by selecting the “Pay Later” option, simple go to the dashboard of the Customer Portal and click on the “Pending Bills” Link.
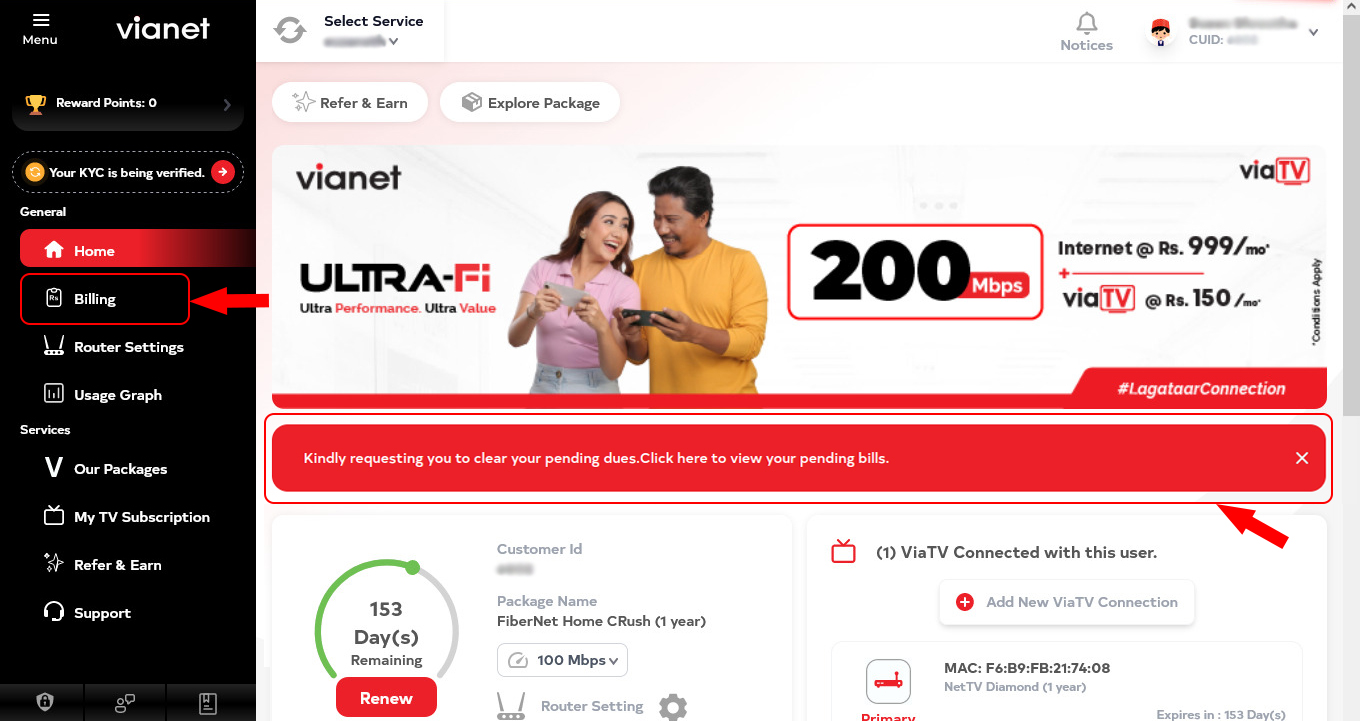
Your list of Pending bill will be shown. Click on “Pay Due” button for the bill you would like to pay online:
Select any of the Payment Gateway available to pay your bill online: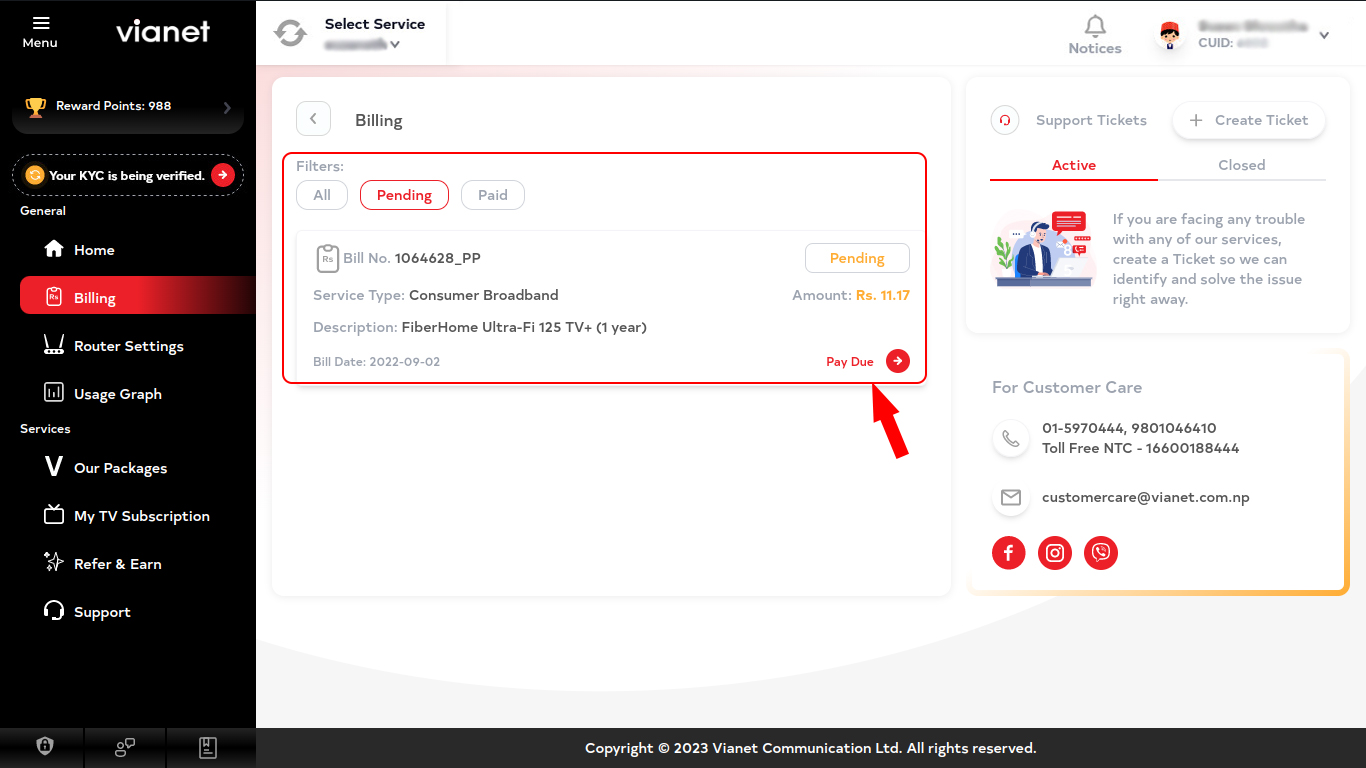
Please kindly follow the instruction on your screen after Payment Gateway selection to complete payment.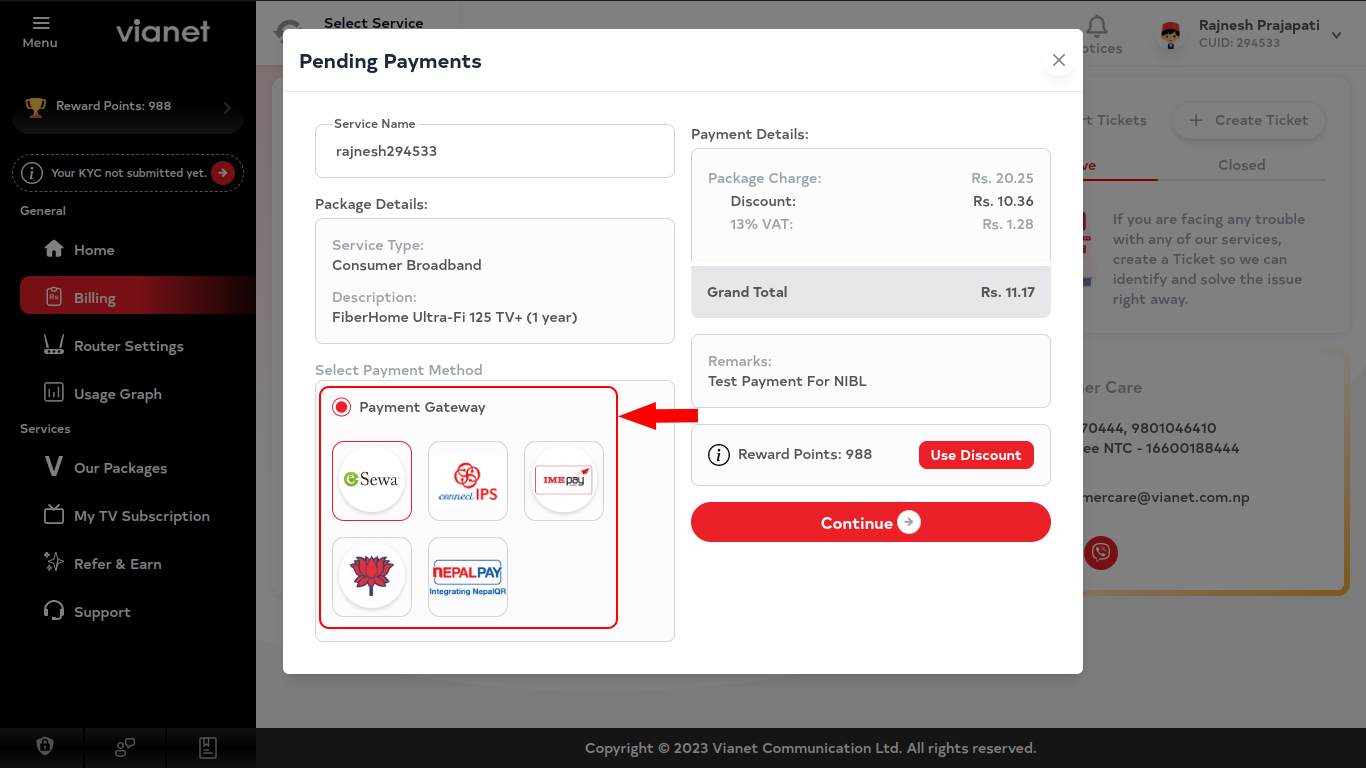
5. How to pay your pending bills online using Customer Web Portal?
- Login to Vianet Customer Portal
If you do not know how to login to our Customer Web Portal, visit the instructions here: “How to Login to your Customer Web Portal?” -
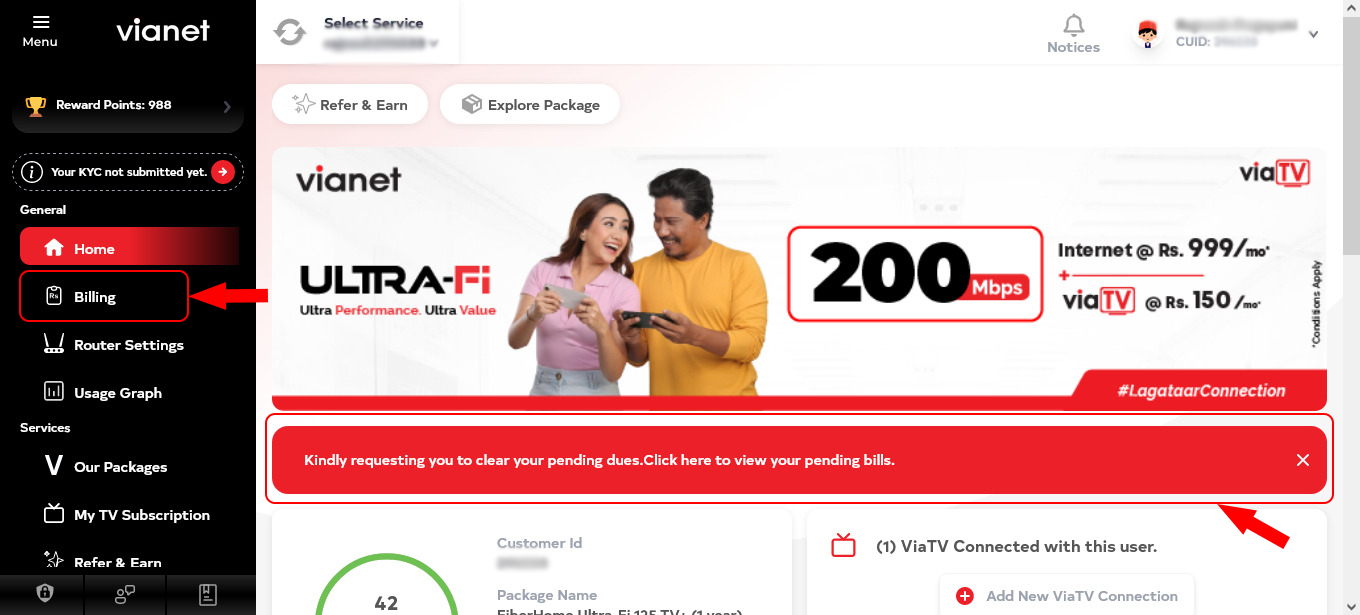
Click on the “Billing” menu on Left Sidebar
OR
Click on the Alert message “Kindily requesting you to clear your pending dues. Click here to view your pending bills.”
-
Your list of Pending bill will be shown. Click on “Pay Due” button for the bill you would like to pay online:

-
Select any of the Payment Gateway available to pay your bill online:

-
Please kindly follow the instruction on your screen after Payment Gateway selection to complete payment.
6. How to Enable your Internet Account after it has been disabled due to pending dues using Customer Portal?
Please note that Customer Web Portal works even when your service is disabled.
- Login to Vianet Customer Portal.
If you do not know how to login to our Customer Web Portal, visit the instructions here: “How to Login to your Customer Web Portal?“ -
If you have multiple internet services, click on the “Select Service”, then it will show list of Services you have taken then select the Internet Service you want to view details of. Select the one for which you want to Enable and proceed.

-
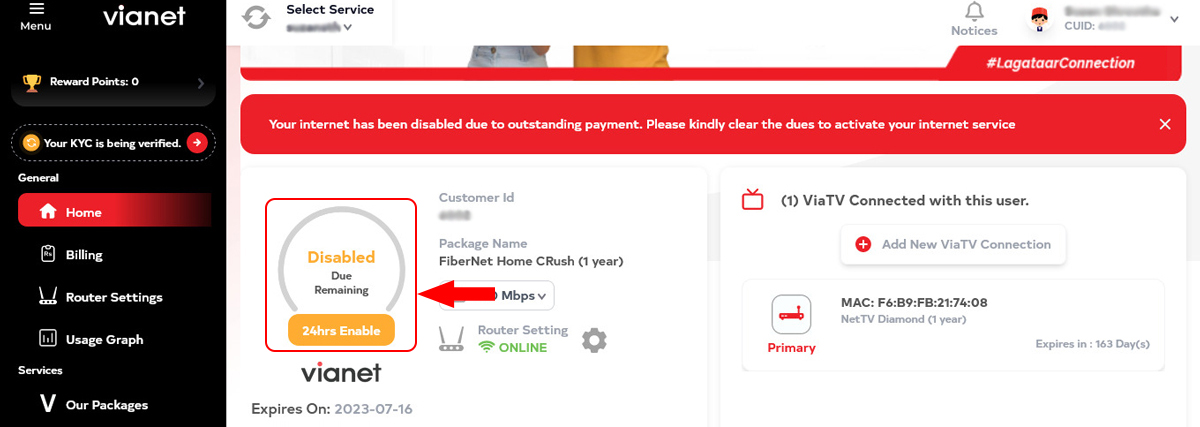
Click on the “24hrs Enable” button on the screen.
Please note that if the “Enable” button is not visible, it means your Internet is not disabled. Please do contact to troubleshoot your issue in such cases.
-
Your Internet account will now be enabled. You should receive a pop-up notification informing you that your internet connection has been enabled.
Please note your service will be active until 9:00am of the next day.
For Example, if you Enable you service on 8 April, your service will be active until 9:00am of 10 April.
Please kindly clear your dues before then.
Please note that the feature can be used one time only.
7. Can we Renew in advance, before our package has expired, using Customer Web Portal?
Yes. Please kindly visit the Section: “How to Renew and Pay Online using Customer Web Portal“.
8. How to apply Reward Point Discount when renewing your internet subscription using Customer Web Portal?
- Login to Vianet Customer Portal.
If you do not know how to login to our Customer Web Portal, visit the instructions here: “How to Login to your Customer Web Portal?“ -
Check your reward points.
Your reward points is displayed at the top left of the Customer Portal: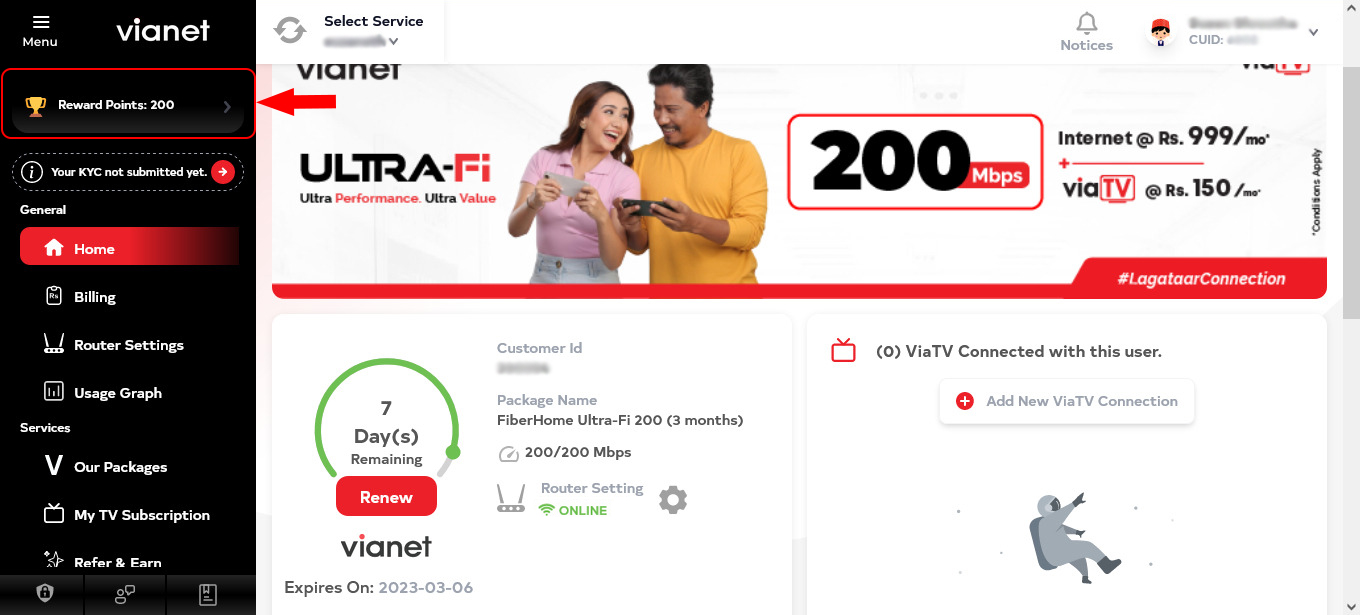
If you do not have any reward points, please kindly visit the Section: “How to make a Referral?” on Step 10.
Click here to learn about Reward Points and how it can be earned. - Go to the “Renew” page.
If you do not know how to Renew your account, please kindly visit the Section: “How to Renew and Pay Online using Customer Web Portal“. -
If you have Vianet “Reward Points“, you can use your Reward Points here to discount your Internet bill.
Click on the “Use Discount” button

System will automatically discount the maximum reward points that can be discounted based on the reward points you have and the total bill amount.
Please note that reward points can only be used to discount a maximum of 50% of the total bill amount.

If you do not have any reward points, please kindly visit the Section: “How to make a Referral?” on Step 10.
Click here to learn about Reward Points and how it can be earned.
9. How to apply Reward Point Discount on pending bill if you have already renewed your account and have pending bill using Customer Web Portal?
- Login to Vianet Customer Portal.
If you do not know how to login to our Customer Web Portal, visit the instructions here: “How to Login to your Customer Web Portal?“ -
Check your reward points.
Your reward points is displayed at the top left of the Customer Portal:
If you do not have any reward points, please kindly visit the Section: “How to make a Referral?” on Step 10.
Click here to learn about Reward Points and how it can be earned. -
Click on the “Pending Bills” Link on the dashboard.
-
Your list of Pending bill will be shown.
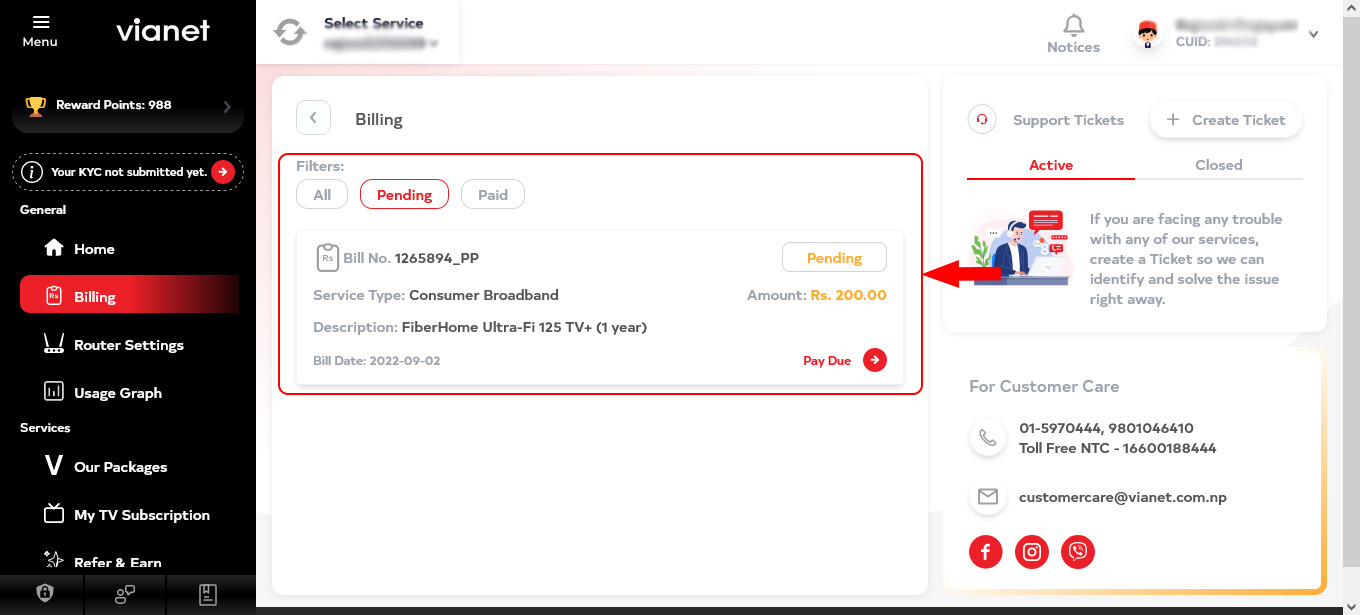
Click on “Pay Due” button for the bill you would like to pay online:
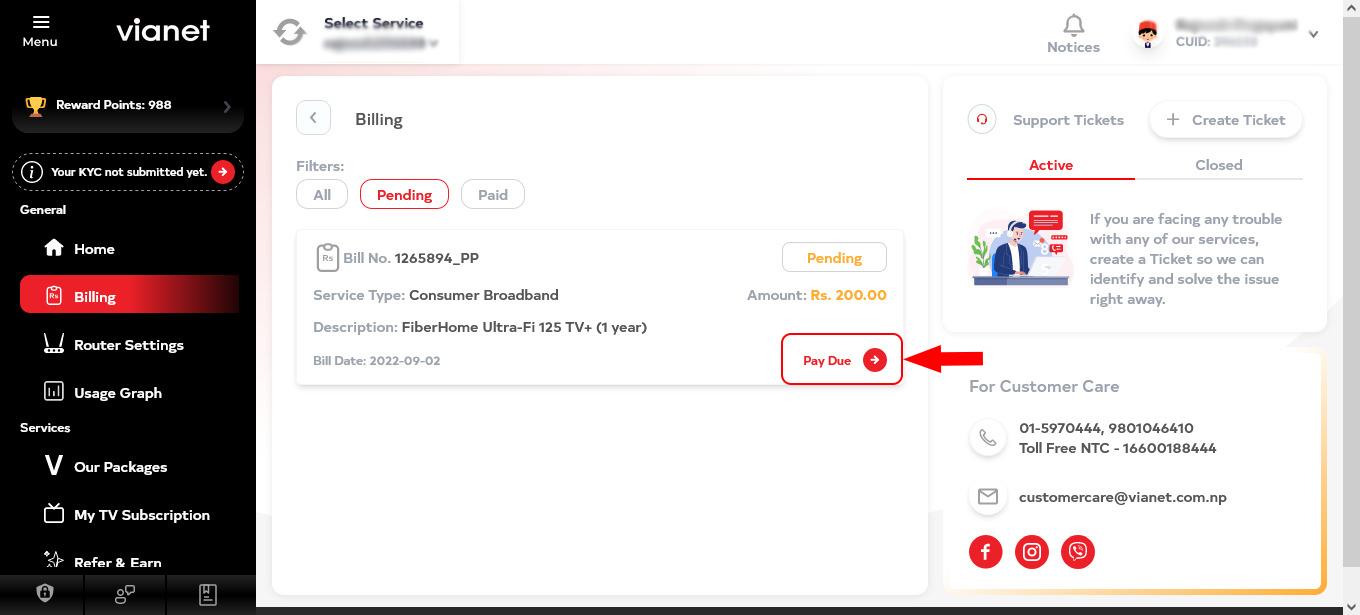
Popup window open with Pending Payments Details (Service Name, Package Details, Payment Method, Payment Details and Reward Points with Use Discount button.
-
Click on “Use Discount” button for the bill you want to apply Reward Point Discount.
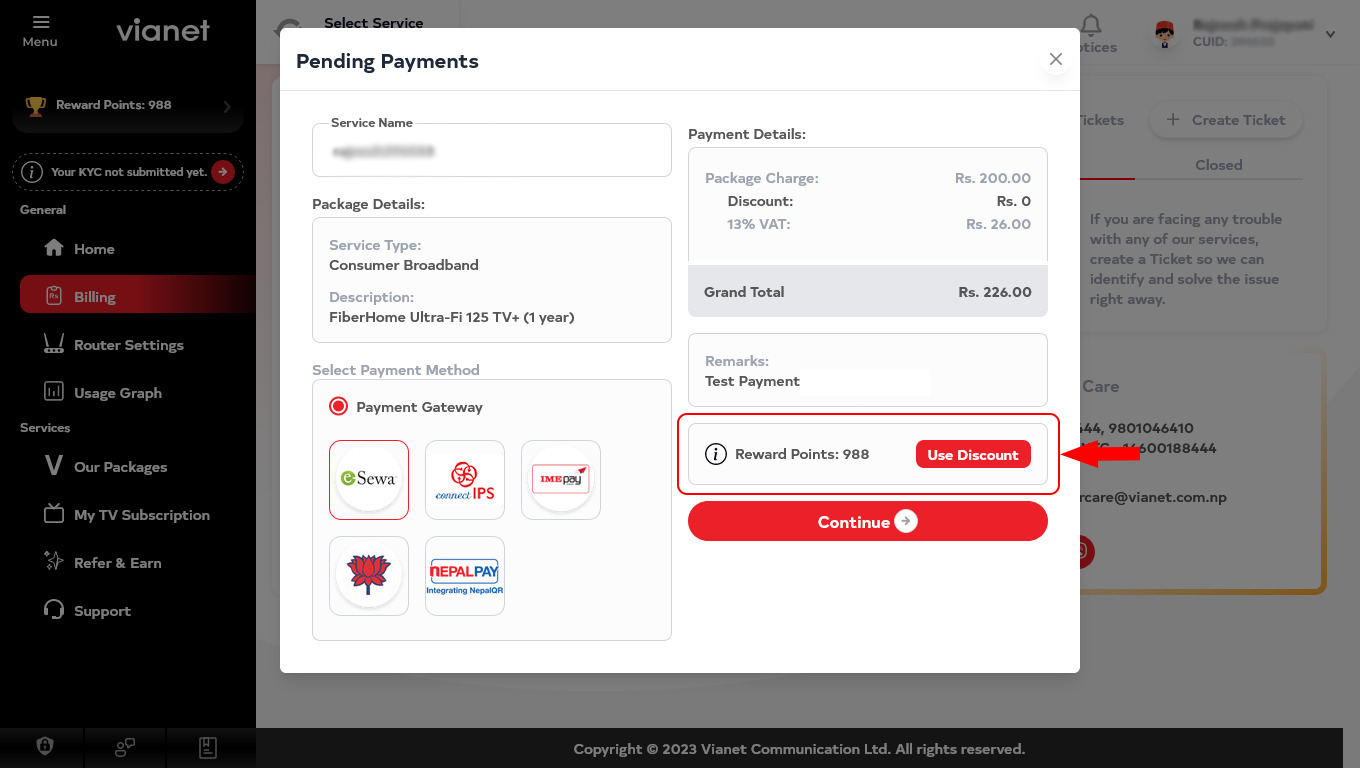
-
Popup window with confirmation message will open “Are you sure you want to use discount?“. Then click on “Yes” to apply discount.
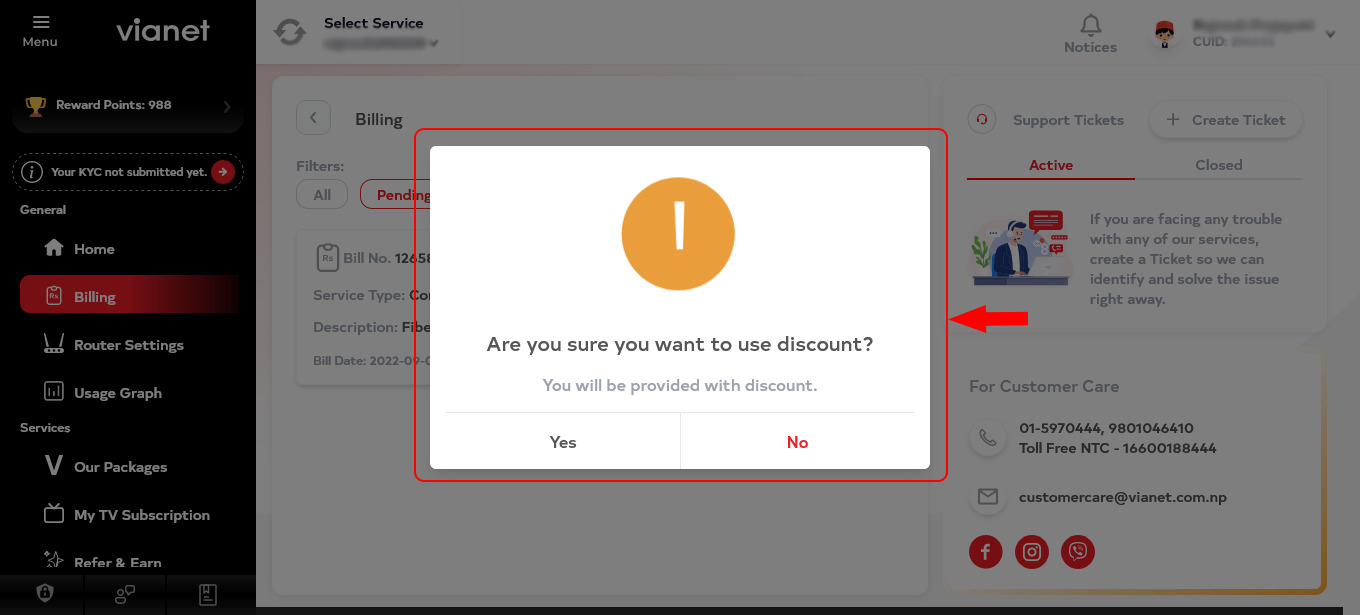
-
You reward point discount have been successfully applied.
System will automatically discount the maximum reward points that can be discounted based on the reward points you have and the total bill amount.
Please note that reward points can only be used to discount a maximum of 50% of the total bill amount.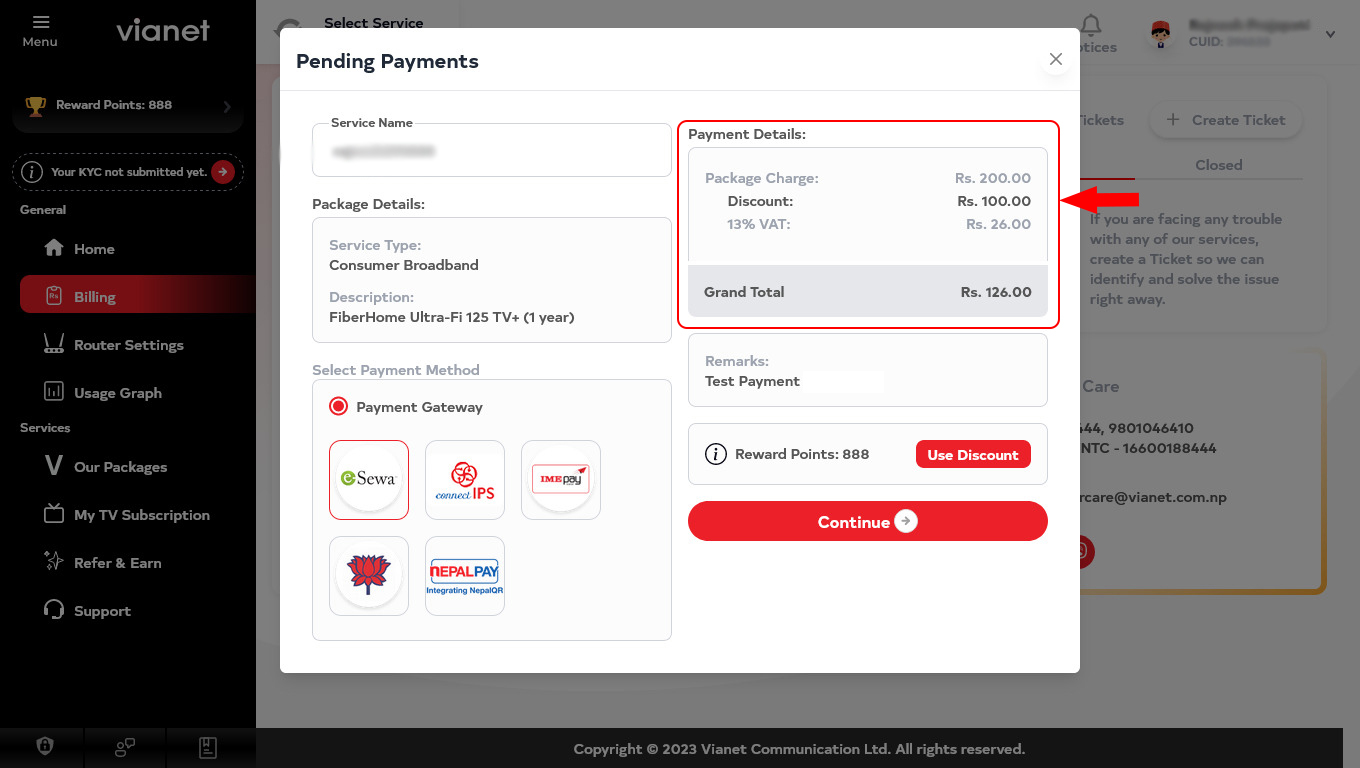
-
You can then proceed to make payment online or at outlet for the pending bill.
To make payment online, please kindly select one of the various “Payment” Gateways available. Then click on “Continue” button.
Please kindly follow the instruction on your screen after Payment Gateway selection to complete payment.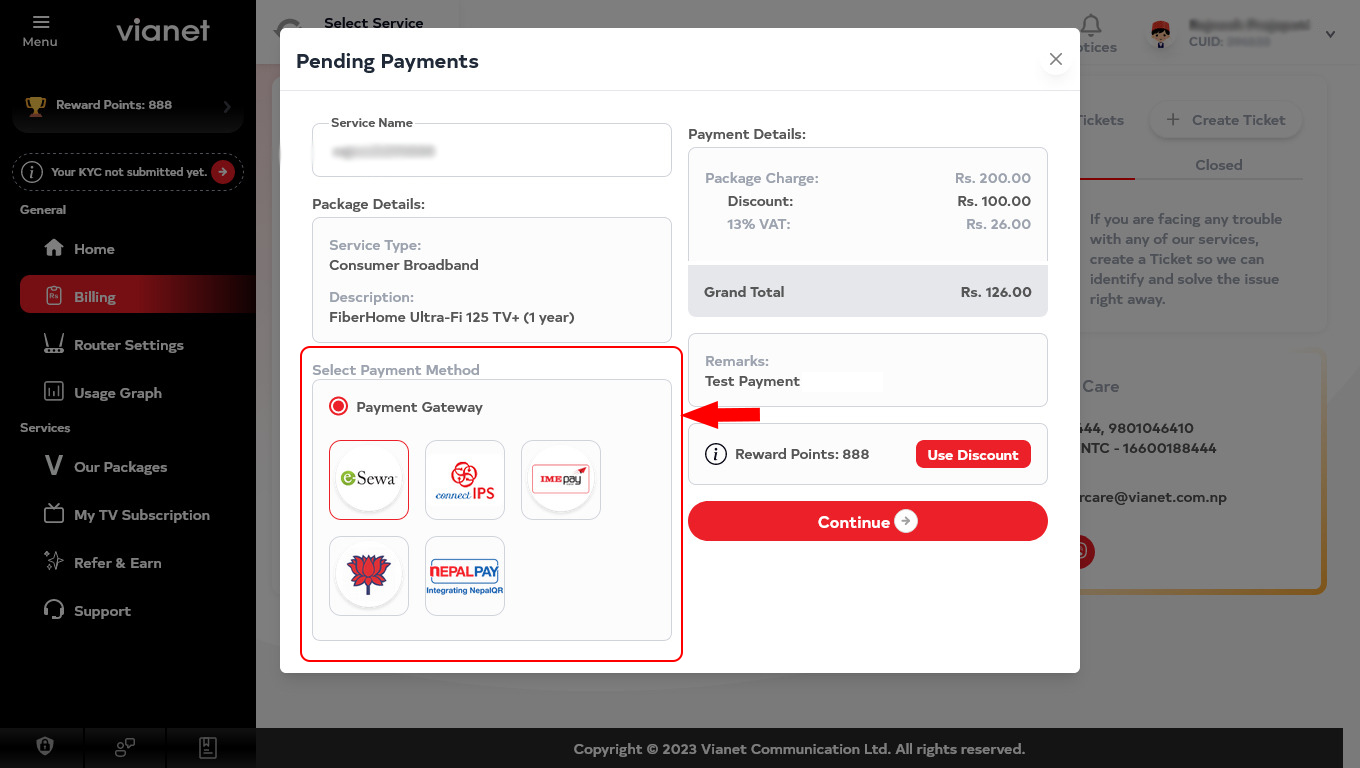
10. How to make a Referral?
You can refer a friend or family using Vianet Customer Web Portal or Vianet Mobile App.
-
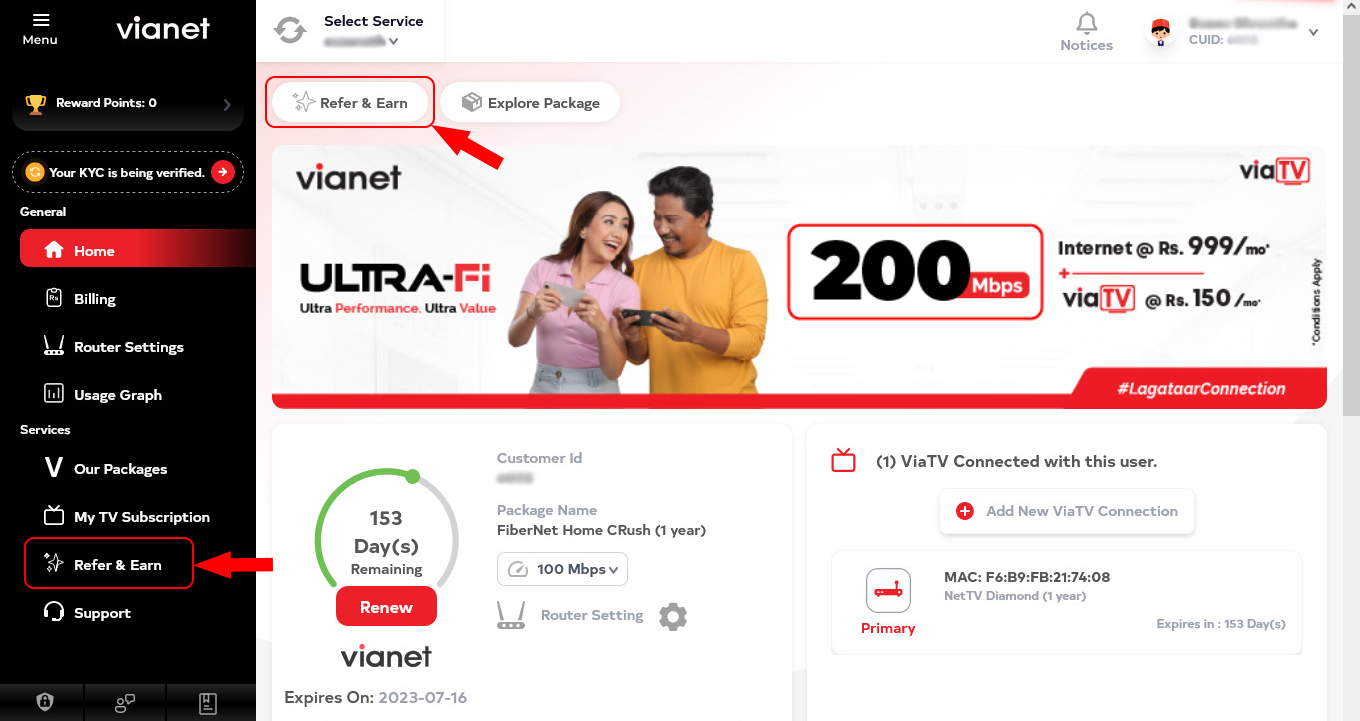
Simply login to Vianet Customer Web Portal or Vianet Mobile App and click on the “Refer & Earn” Link
To login to Vianet Customer Web Portal: Click here (https://customers.vianet.com.np)
-
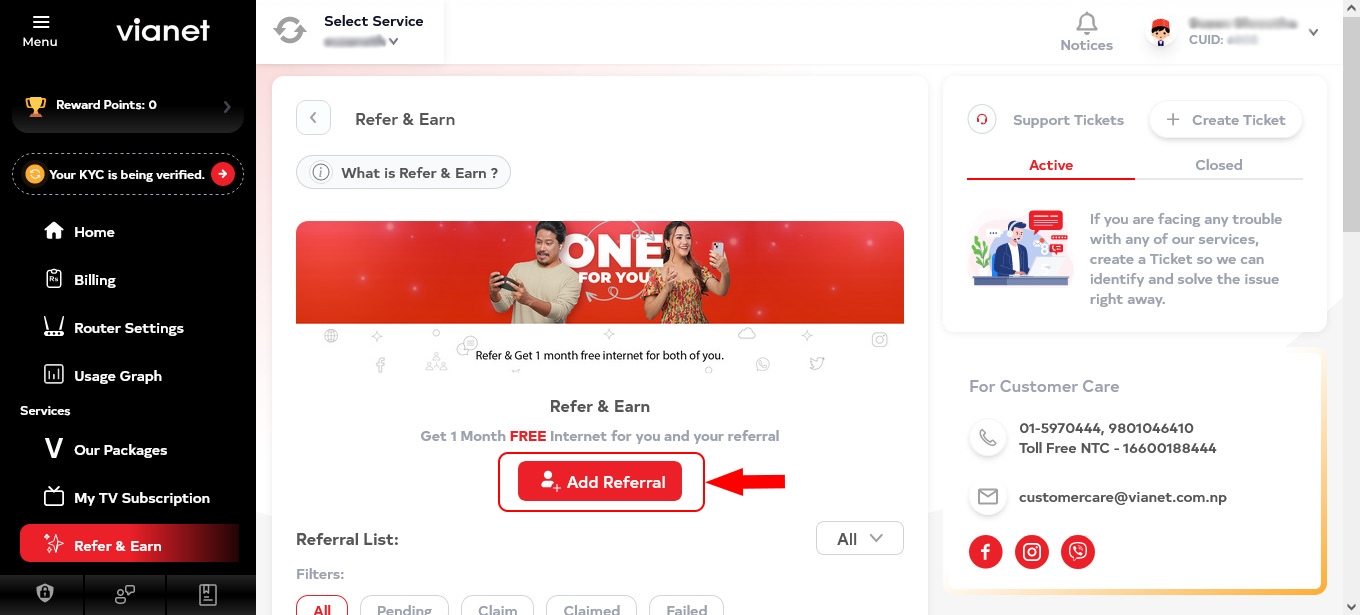
Then, click on the “Add Referral” button
-
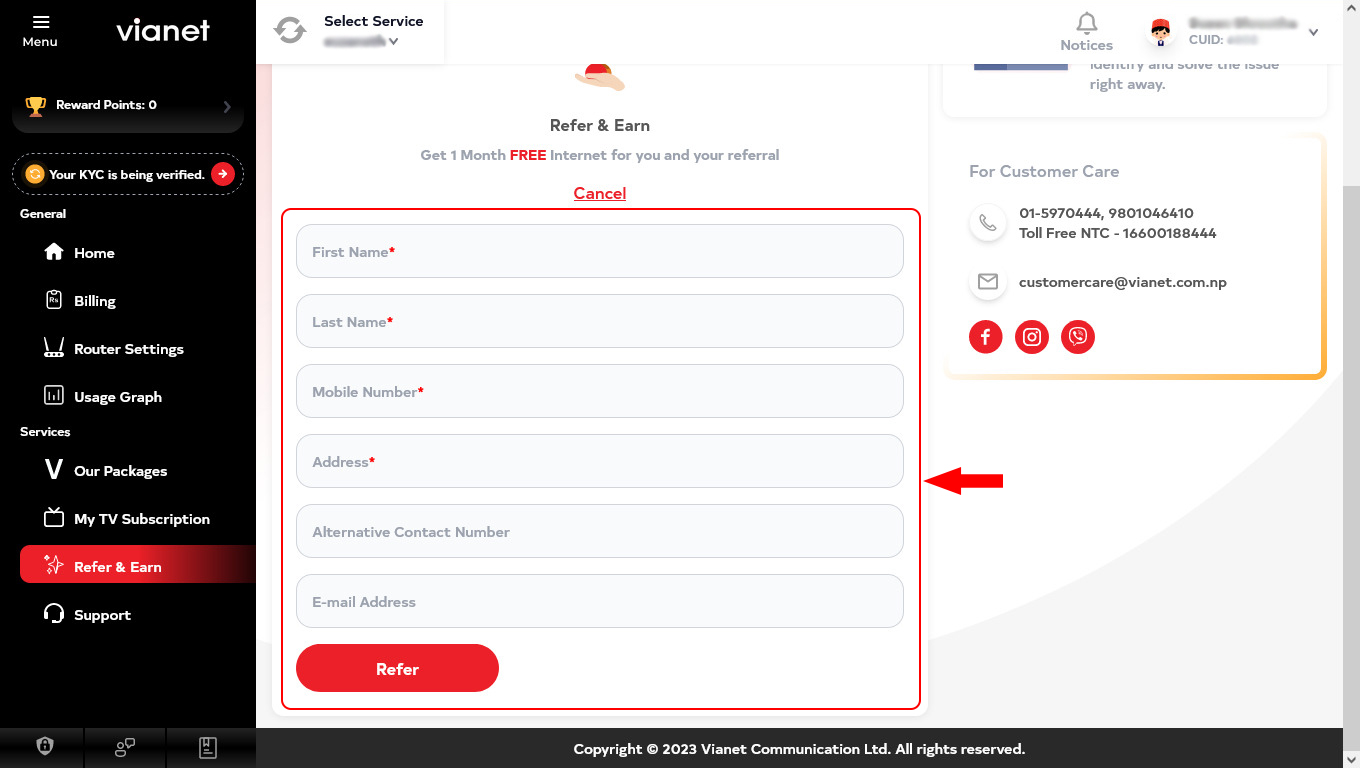
Fill in the contact details of the person you are referring to.
-
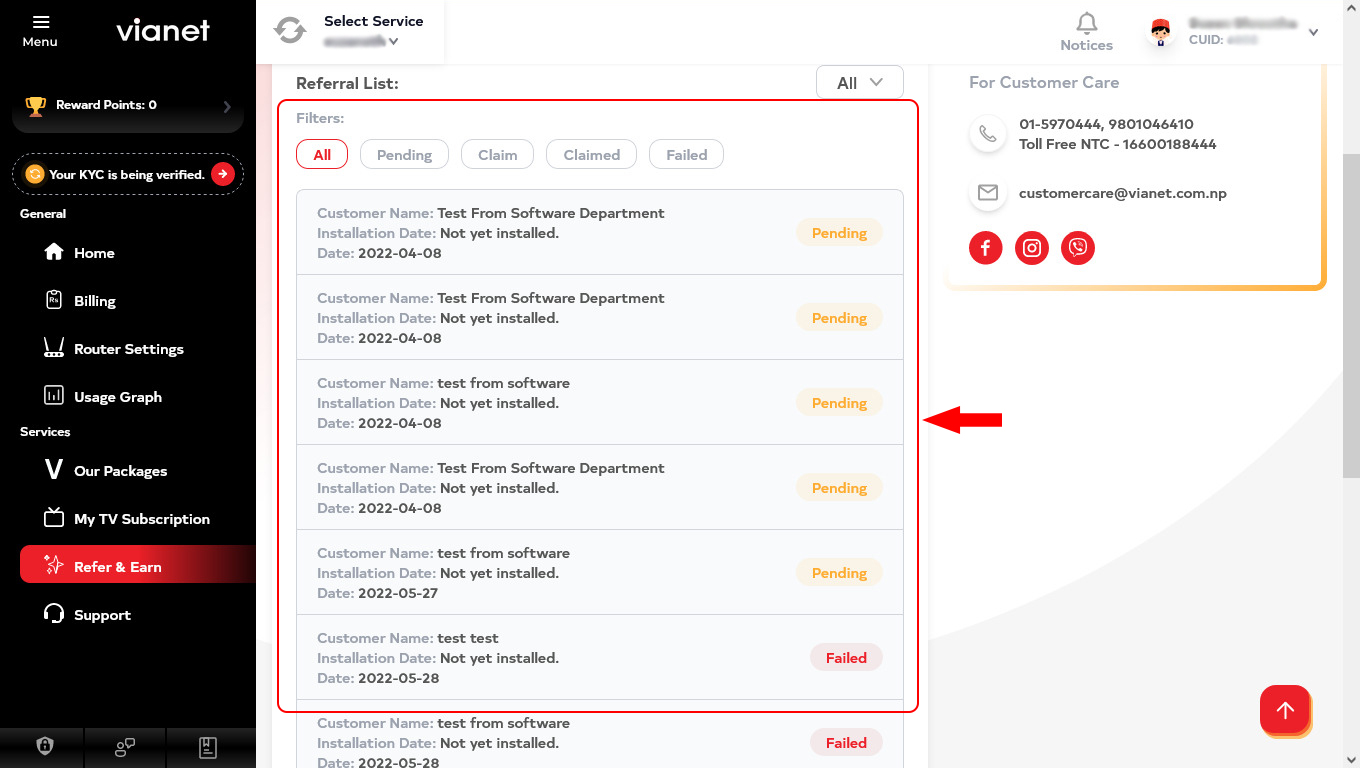
Once done, you will see list of all the refer you have made on “Referral List” section in the “Refer & Earn” page and see its status on the right:
-
The contact referred will then get a call from Vianet.
If they confirm the package, our team will then proceed for installation.
After installation is completed and the client makes payment, you will receive a free month of your subscribed internet in your customer portal. The status will changed from “Pending” to “Claim”, click on the claim button to receive your free month.
11. How to open a Support Ticket using Vianet Customer Web Portal?
- Login to Vianet Customer Portal.
If you do not know how to login to our Customer Web Portal, visit the instructions here: “How to Login to your Customer Web Portal?“ -
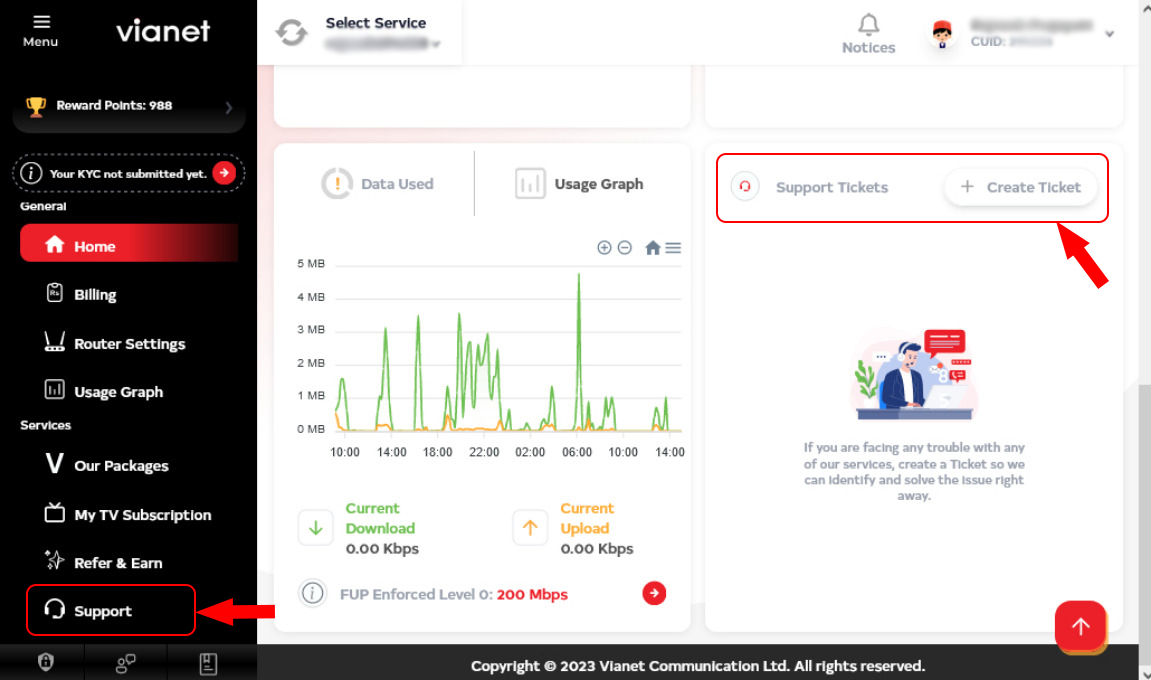
Click on the “Support” link on left Sidebar menu Or on Bottom left side you will find “Support Ticket section to create new ticket, on the Dashboard:
-
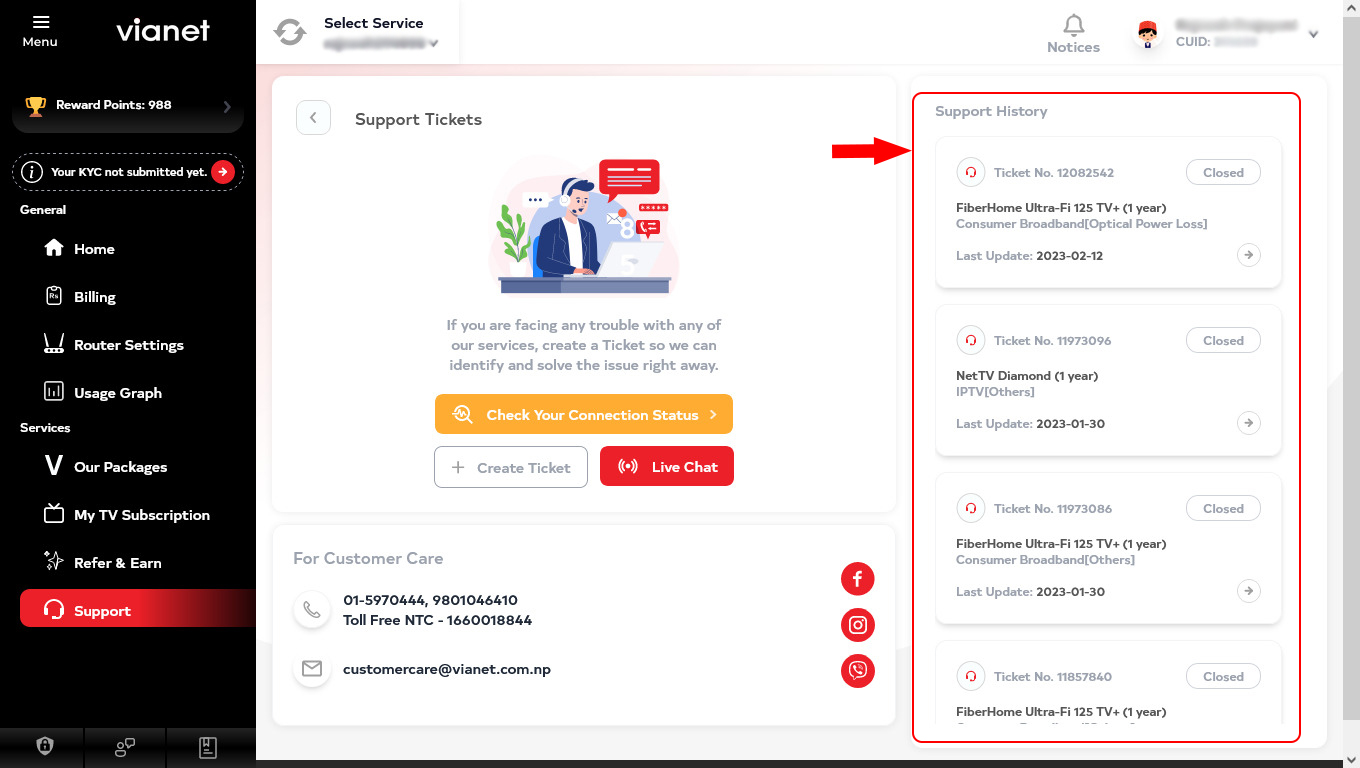
On “Support Ticket” page You can view your list of previous and current Support Tickets under “Support History” section.
-
To open a “Support Ticket“, click on the “Create Ticket” button.
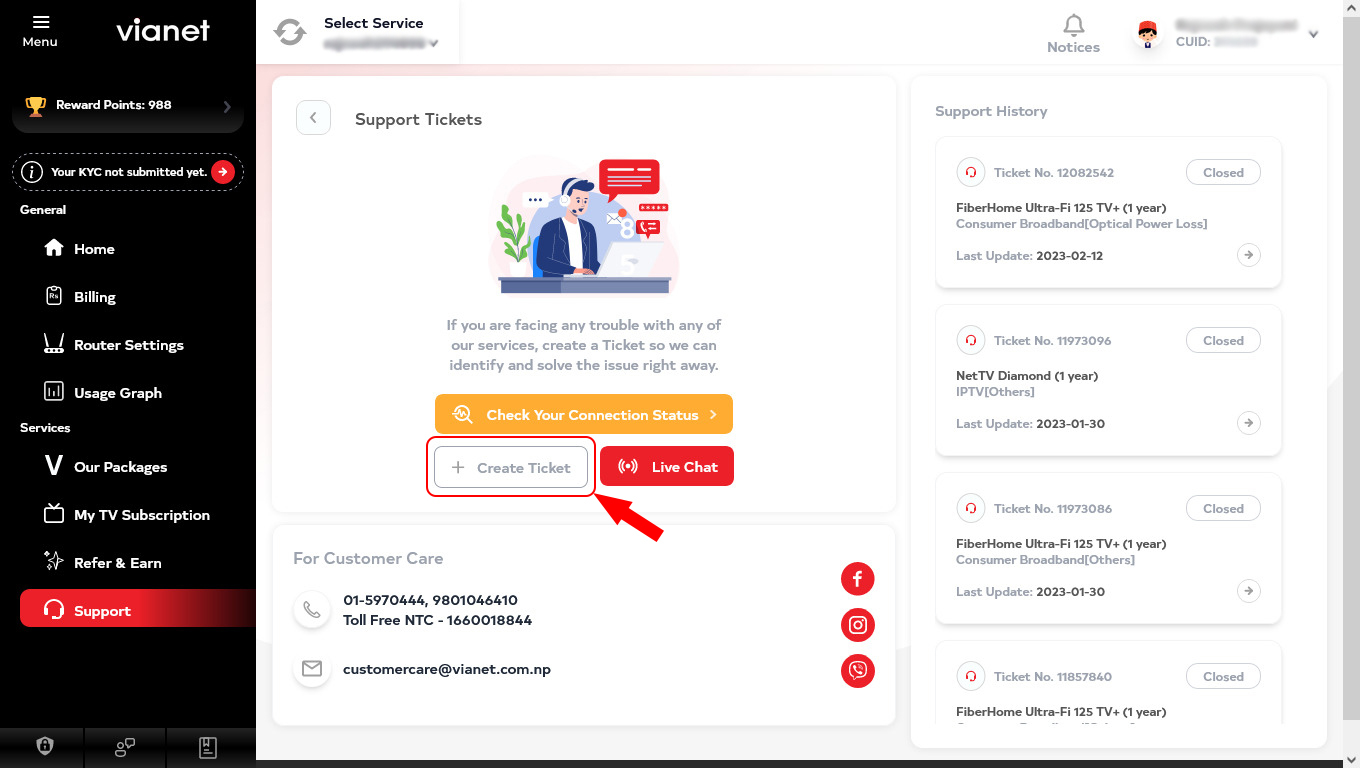
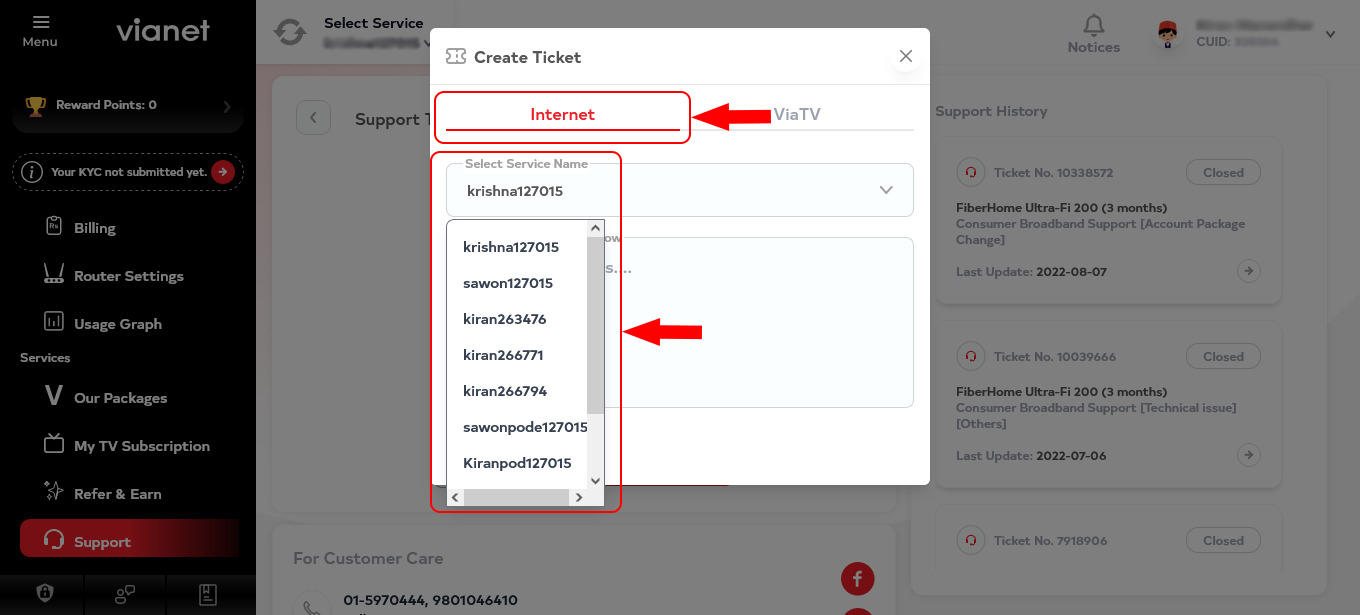
You can then select if you want to open a ticket for your Internet or IPTV connection.
If you have multiple internet services, you can select the Internet account service name for the internet account you want to raise the ticket for from the “Select Service Name” dropdown box
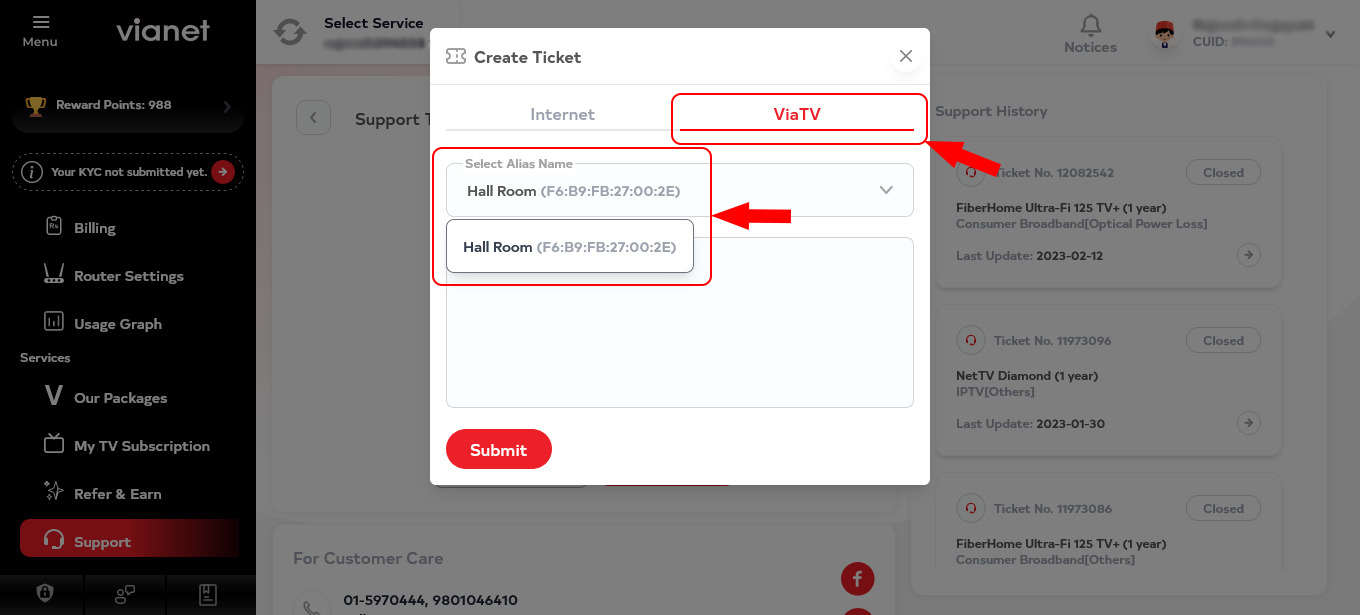
You can type the nature of the problem you are facing and your personal remarks as well.
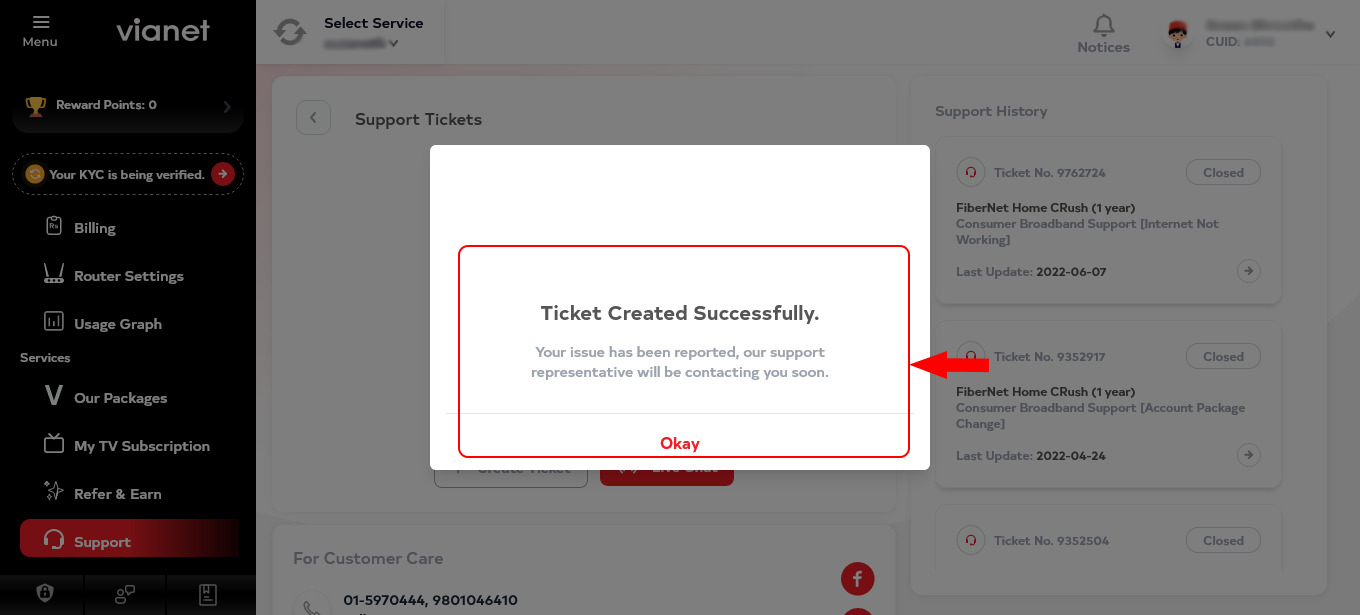
Please kindly submit your ticket to open Support Ticket.Once your ticket has been submitted, “Ticket Created Successfully“, message will appear on the popup window
-
Now your Support Ticket should now be visible in the Support page under “Active” tab a shown below:
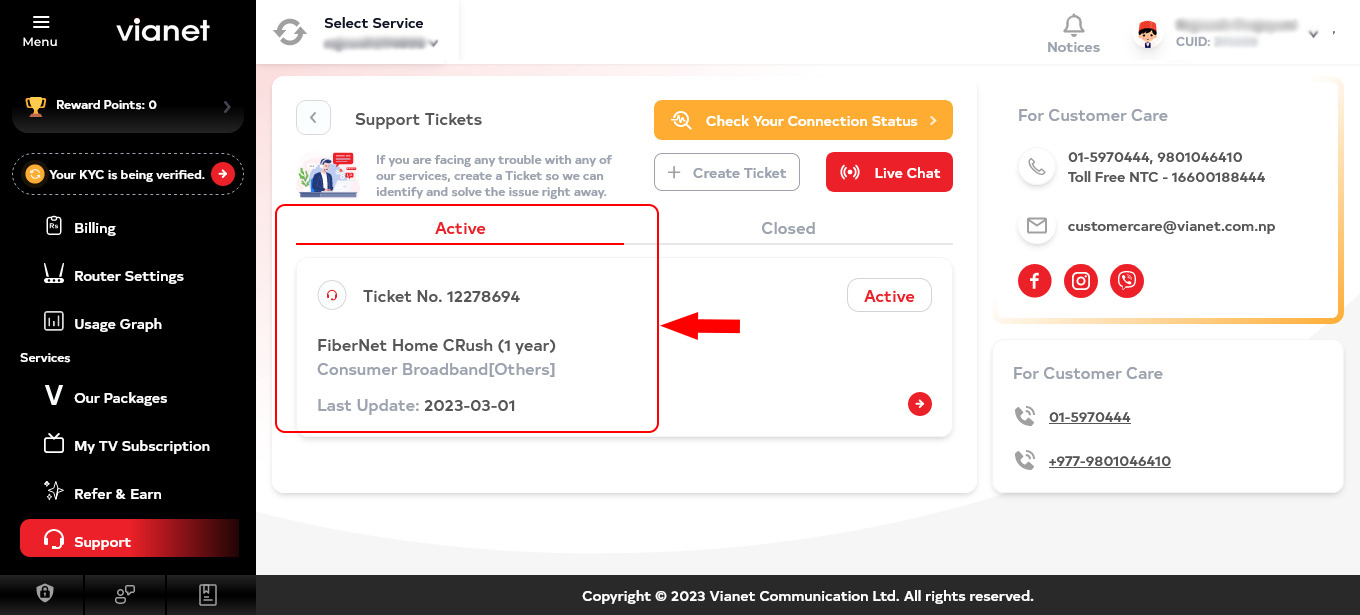
if you want to send further message then you can click on “Arrow” button
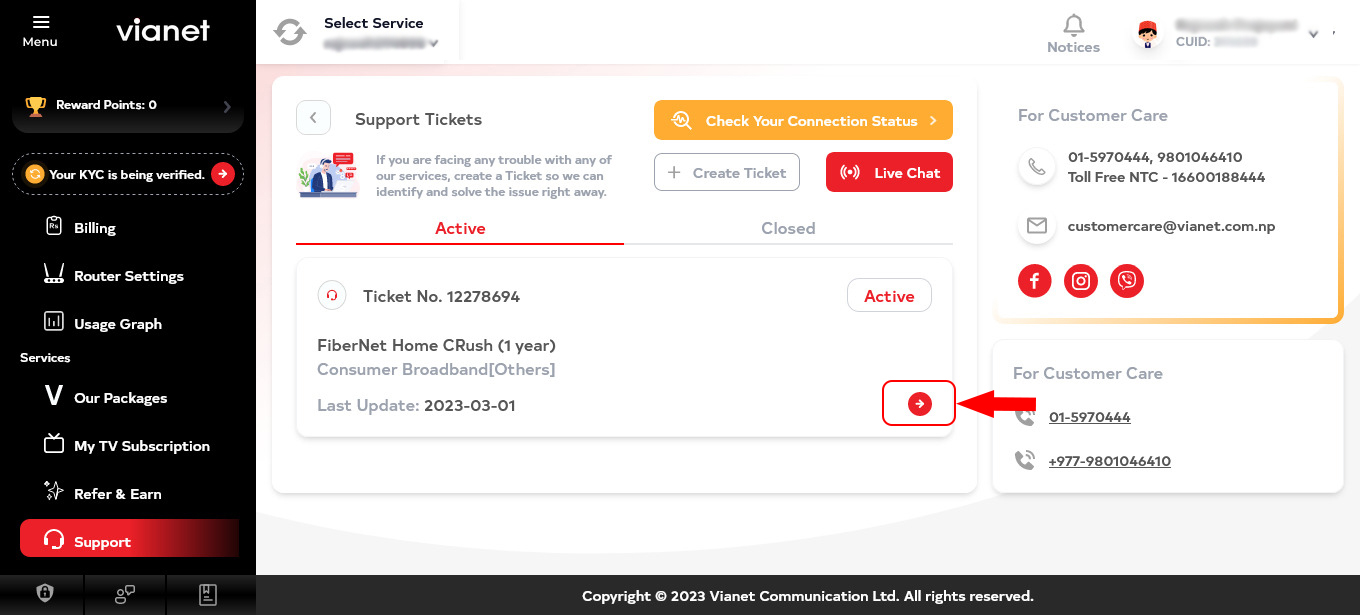
You can chat with our Technical Support team or view updates on your ticket by clicking on the “View Details” arrow button
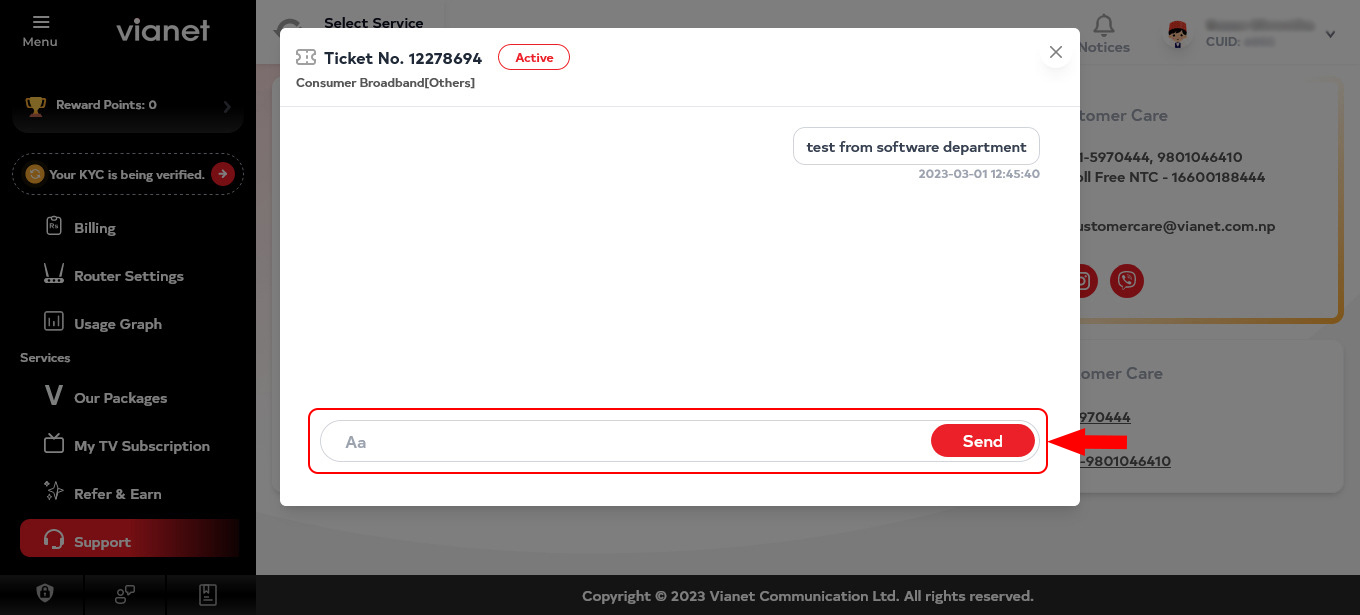
-
If your messsage has not been replied from Customer Care or Support team for “24 hours“, addtional “Nudge” button will apper, Click on “Nudge” button to get the attentions.
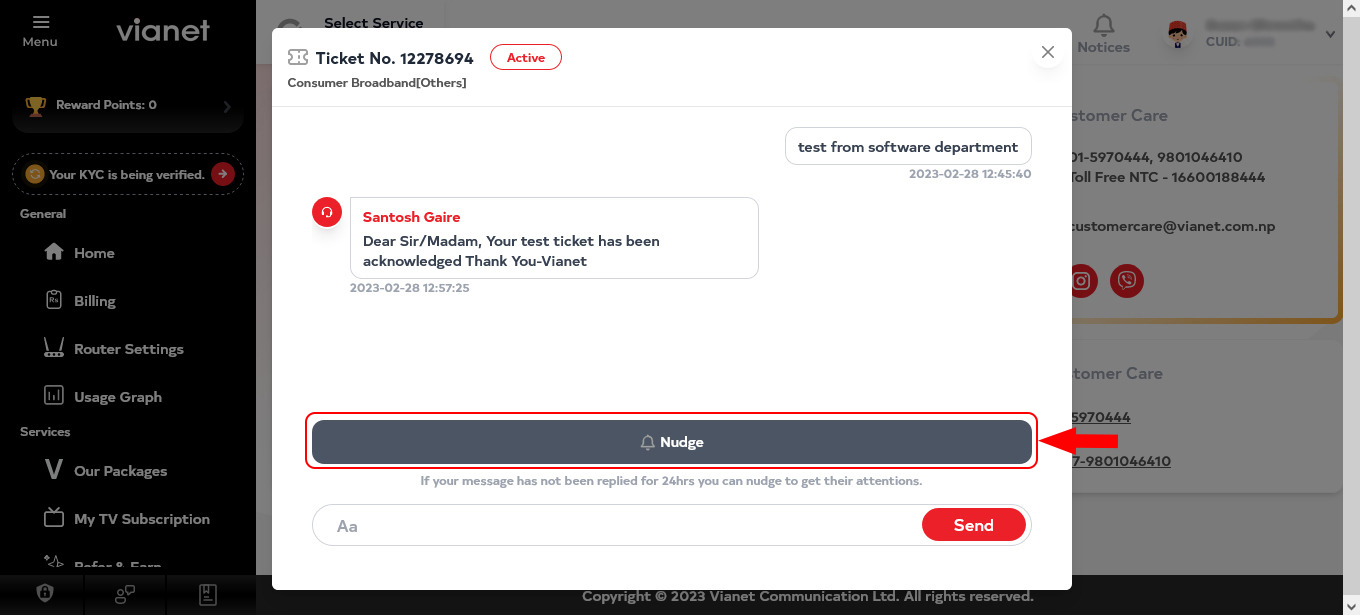
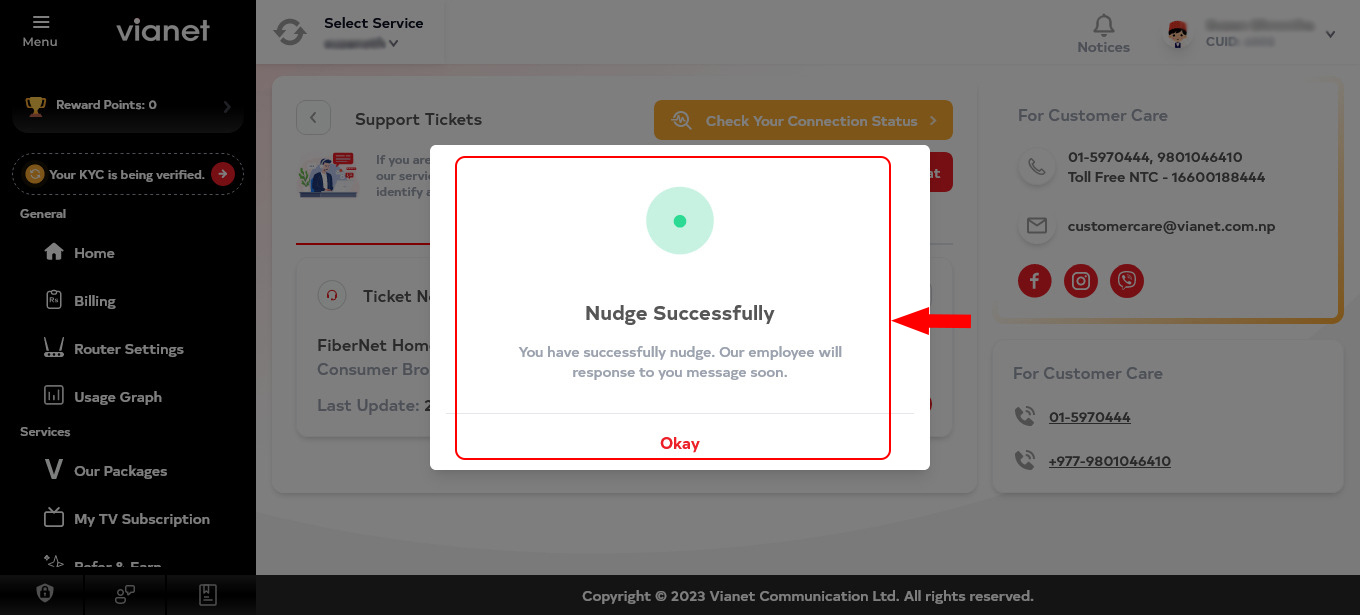
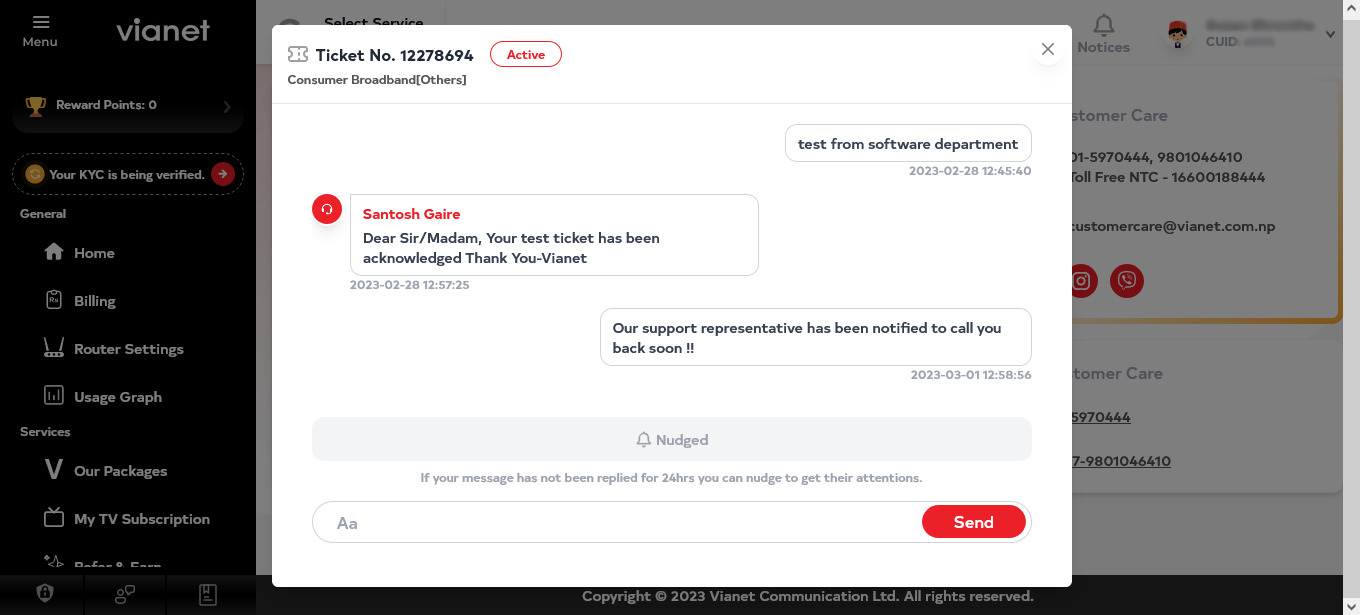
If the ticket is resolved, it will be marked from “Active” to “Closed”.
-
If you want to check your connection details, please click on “Check Your Connection Status“
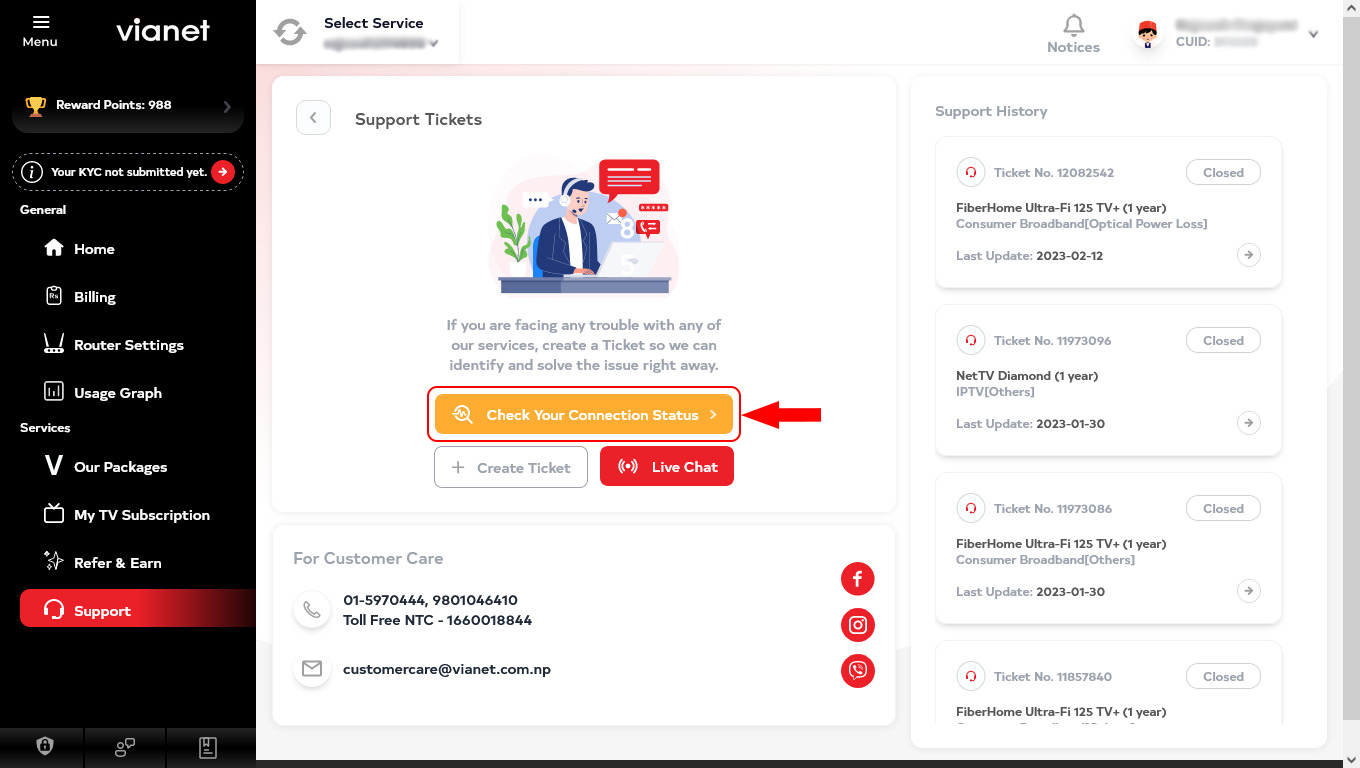
Then it will start Analyzing your connection
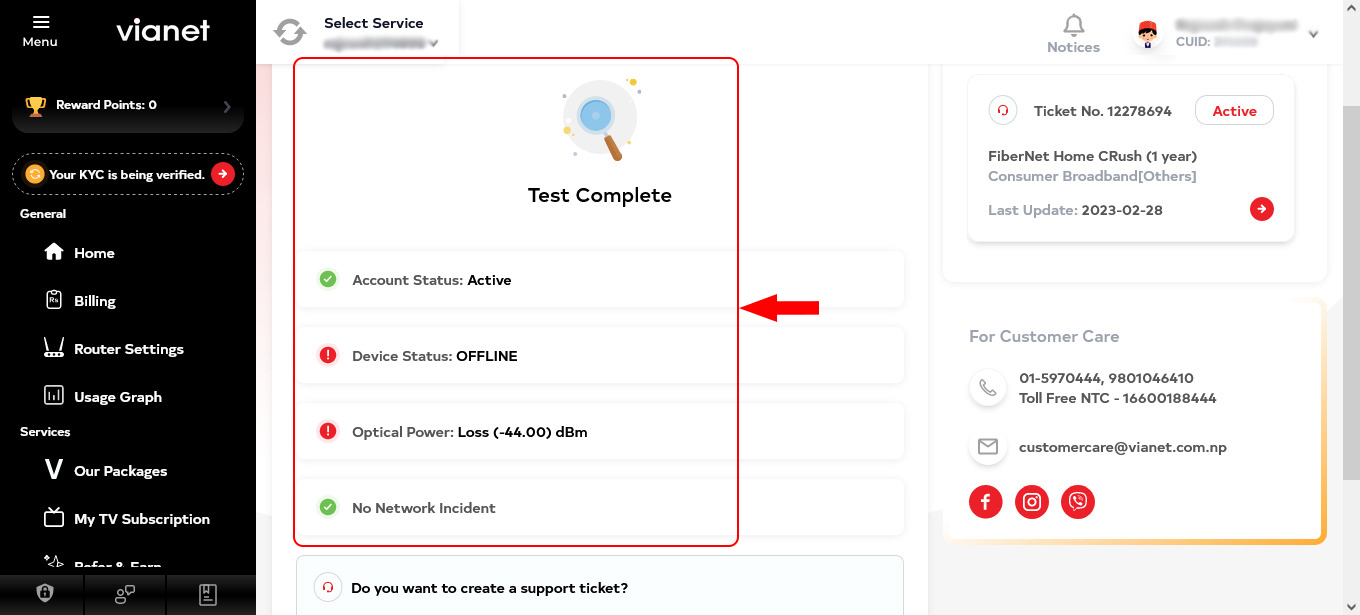
After completing Analyzing process it will show the Test result details a shown below:

12. How to manage your Fiber WiFi Device Wireless Settings such as changing WiFi Password using Customer Web Portal?
- Login to Vianet Customer Portal.
If you do not know how to login to our Customer Web Portal, visit the instructions here: “How to Login to your Customer Web Portal?“ -
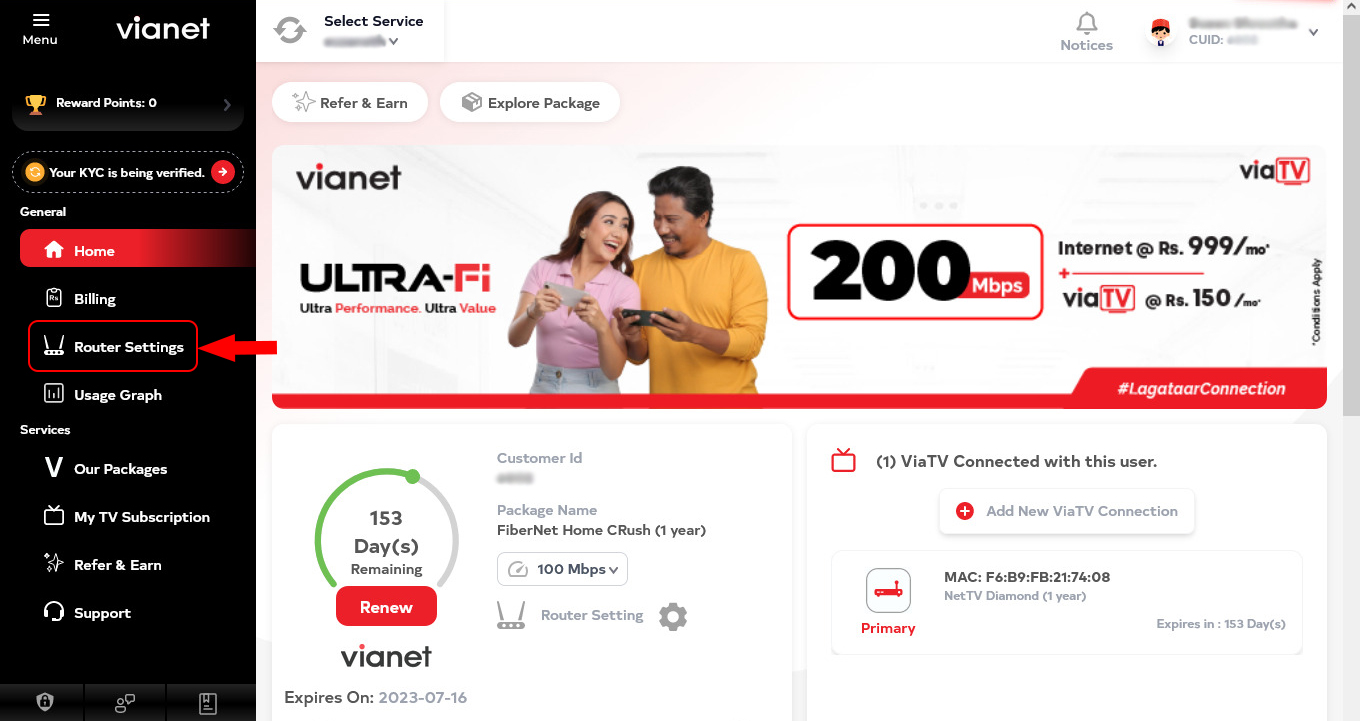
Click on “Router Settings” link on left sidebar menu.
-
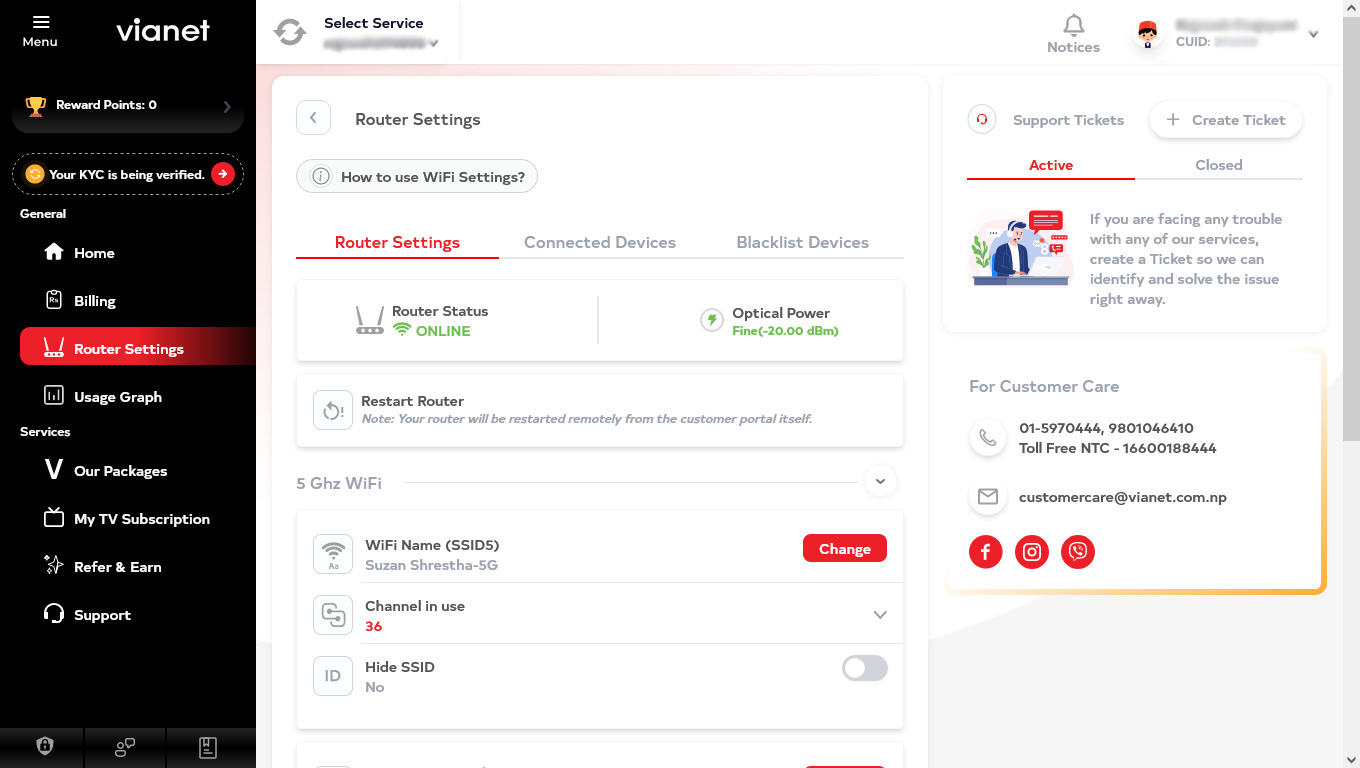
On “Router Settings” page you will find 3 different Tabs (Router Settings, Connected devices & Blacklist Devices) with different settings and it’s details
-
Please find the description of each of the setting options under “Router Settings” tab
Router Status & Optical Power:
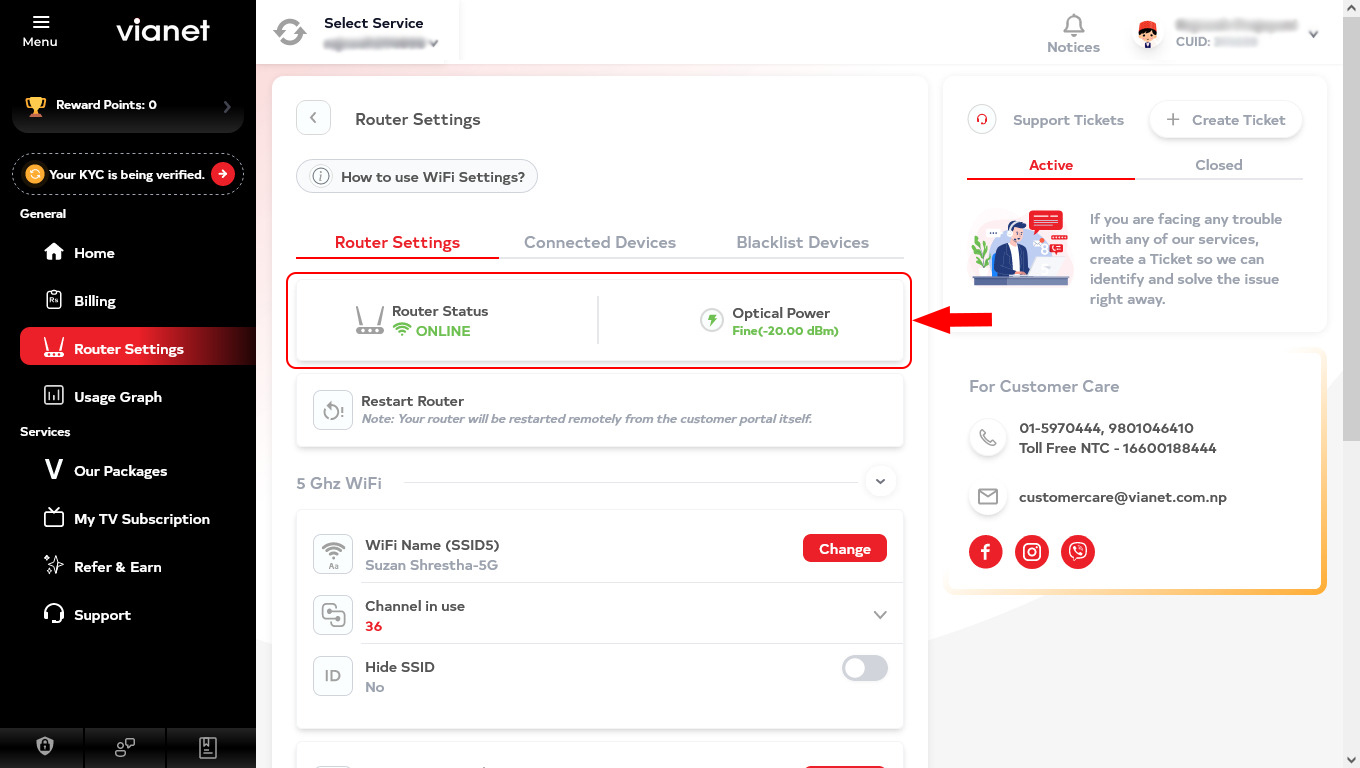
Router Status
Easily know whether your ONU is ON or OFF. Router Status (Online = ON, Offline = Off).
Optical Power:
Optical Power refers to the signal strength between your Fiber Wifi Device and Vianet.
Optimal optical power range is between -18 dbm and -25 dbm.
Your status light will turn red if no signal is found between your device and Vianet. This could be due to various reasons such as fiber cable unplugged from device, fiber cable damaged, fiber breakage in your area and so on. You can add a support ticket through Customer Web Portal so that we may help troubleshoot during such cases. Visit “How to open Support Ticket using Customer Web Portal?” in this page.
Restart Router:
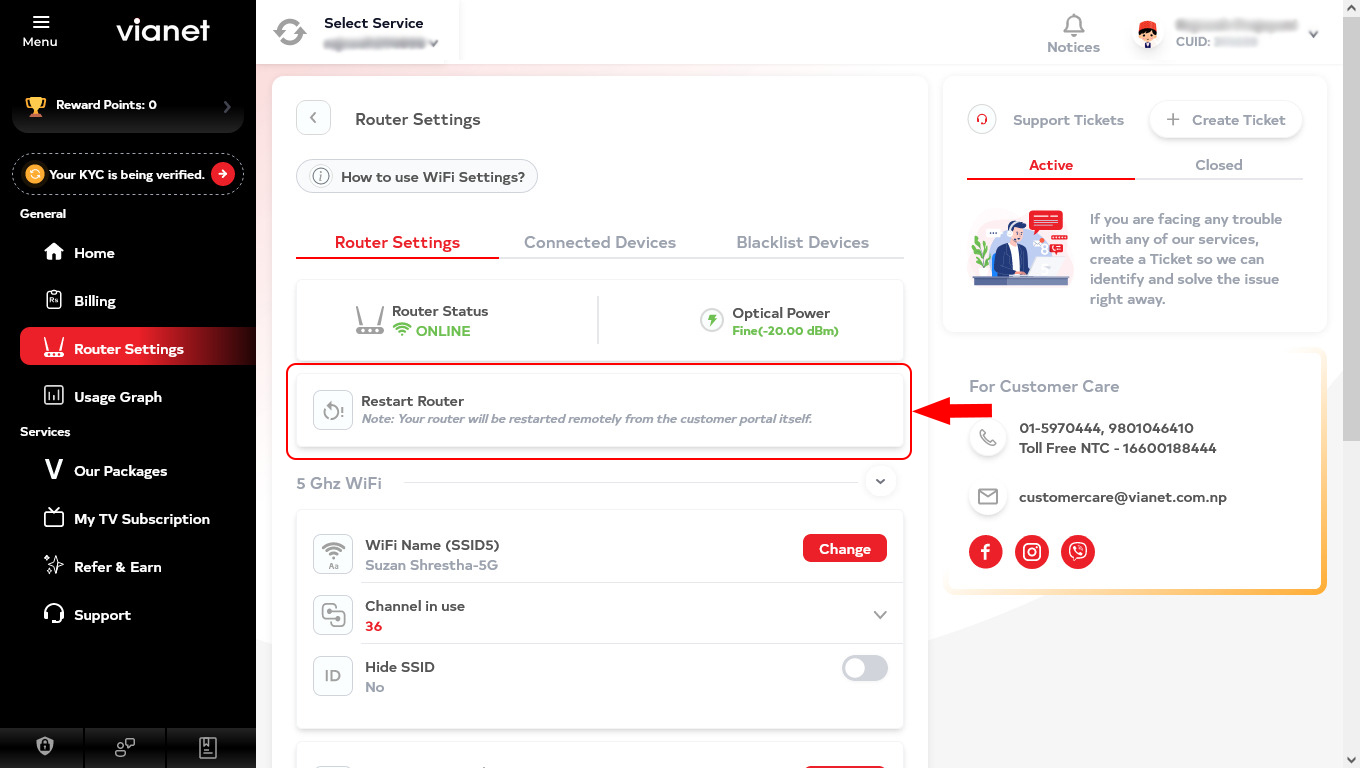
You can restart your router remotely form the customer portal itself.
Router Details:
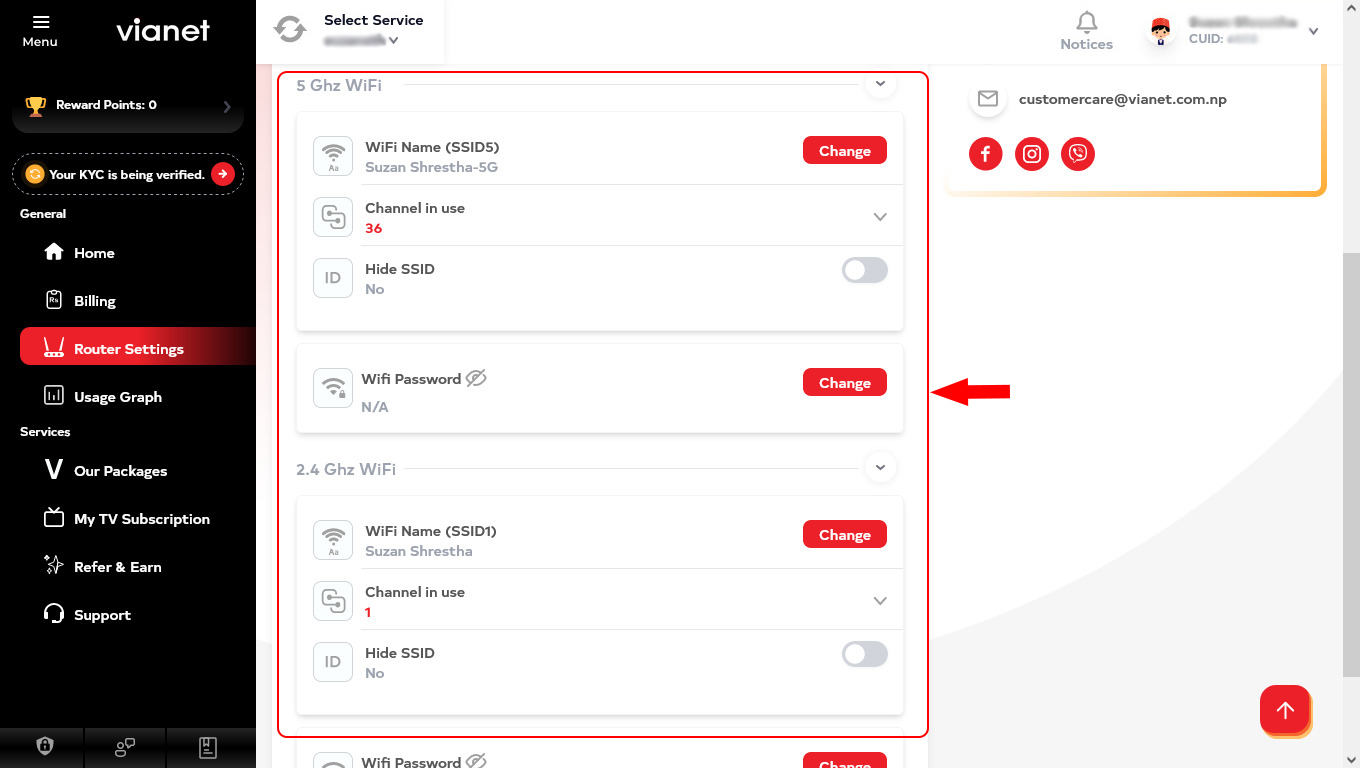
If you are using “Dual Band Router” then you will find both 2 Ghz & 5 Ghz WiFi settings. And you are using normal router then you will only find 2 Ghz WiFi settings.
Changing your WiFi Name (SSID) or Password:
SSID refers to your WiFi name. You can change your “WiFi Name (SSID)” by clicking on the “Change” button.
“Hide SSID” allows you to hide your wireless network so that it is not visible when searching for wireless network. This is effective if you want to improve the security of your WiFi. However, we only recommend advance users choose this option as connecting to a hidden WiFi (SSID) has a more complicated procedure.
You can change your “WiFi Password” by clicking on the “Change” button in the “Password” section. We recommend that the password be changed frequently as a security measure to not allow strangers to access your WiFi.
Change your WiFi Channel (Channel in Use)
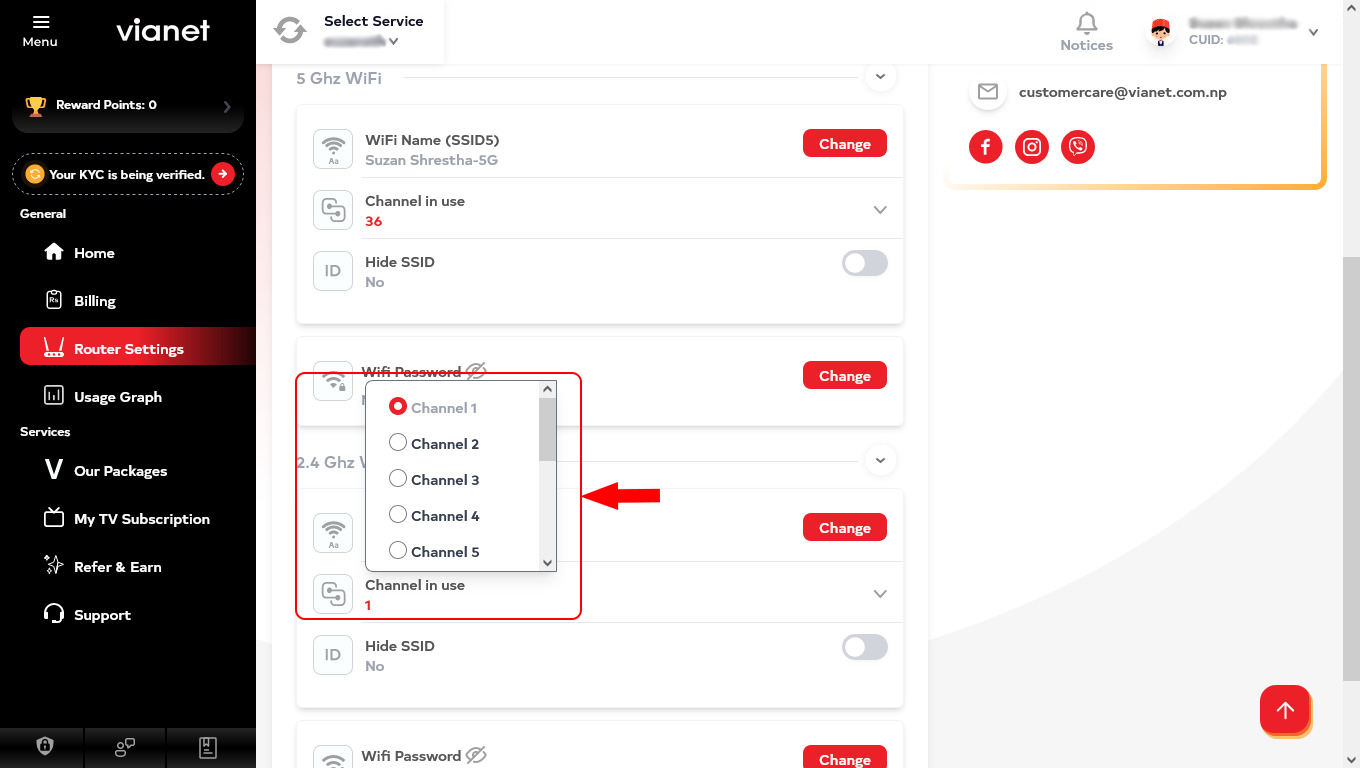
“WiFi Channel” refers to the wireless frequency by which your Fiber WiFi Device communicates to the several devices you use to surf the Internet. If there are other wireless routers nearby using the same WiFi channel it might cause interference and disrupt wireless communication from your Fiber WiFi Device to your other connected devices which will cause slow internet performance.
You can try changing the WiFi channel so as to decrease the interference from nearby wireless routers.
-
Under “Connected Devices” tab, you will find the list of devices that are connected on your network
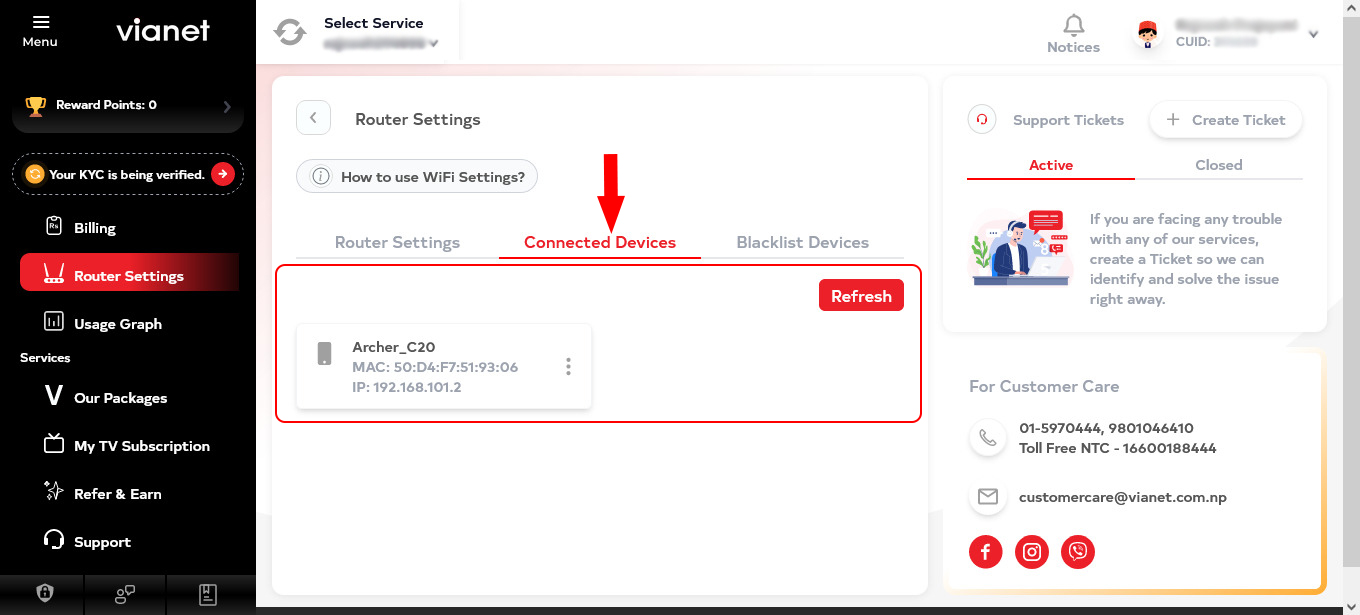
You can “Blacklist or Block” the connected devices from your network. To Block the connected devices, click on the “
3 Dotted Icon “, as shown on the screenshot below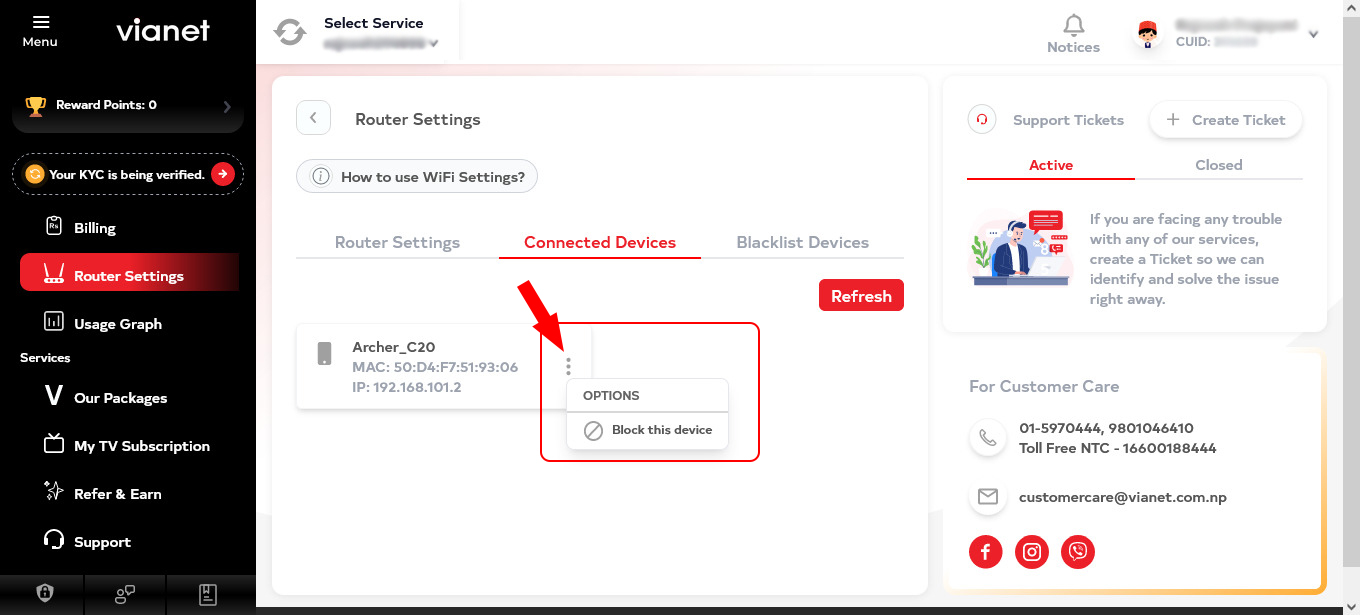
Then click on the “Block this device” link
You can click on the “
Refresh ” button to check the latest connected devices on your network. -
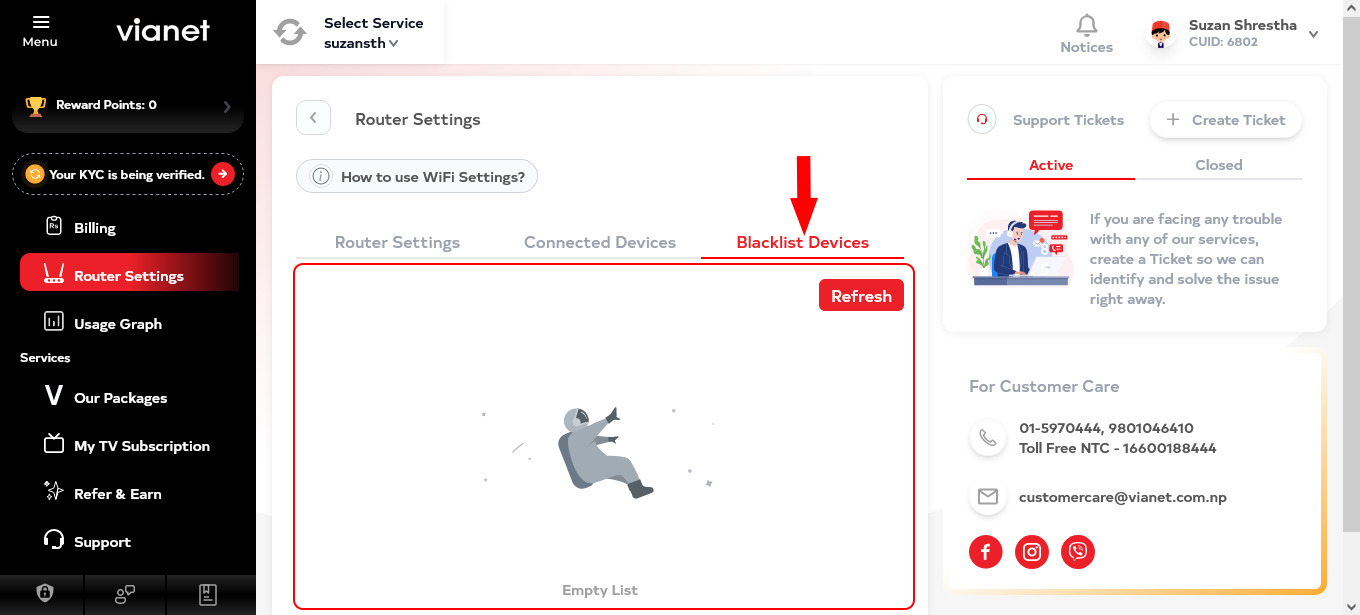
Under “Blacklist Devices” tab, you will find the list of devices that you have Block from your network
